Inspection Observation Attachments
You can directly add, view, and edit attachments within observation fields for inspections to improve the clarity of inspection data, leading to faster decision making and more effective asset management.
- Open an inspection.
- Tap Observations.
The Observations page opens. The Attach icon beside each field displays the number of existing attachments, if any.
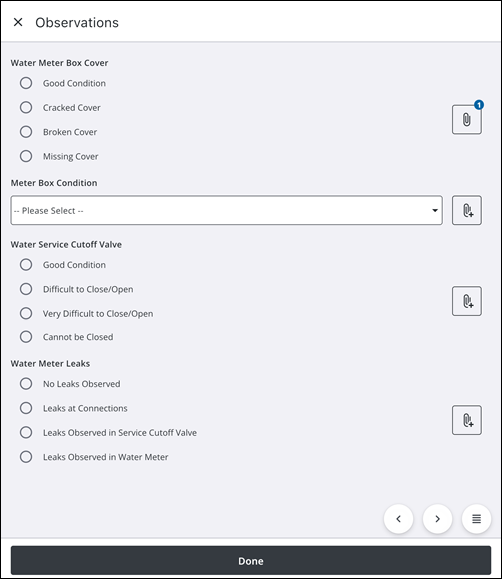
You can attach a photo, video, map capture, or document to the observation field.
- Tap the Attach icon.
- Tap the desired attachment type to add.
- Photo: Tap to add a photo.
- Video: Tap to add a video.
- Camera Roll: Tap to add an existing photo from the device's camera roll.
- Map Capture: Tap to add a map capture.
- Document: Tap to add a document.
- Add the attachment.
- Markup: Tap to mark up the attachment.
- Rename: Tap to rename the attachment.
- Description: Tap to add a description for the attachment.
- Back: Tap to return to the Observations page without saving.
- Tap Save.
You can view attachments associated with the observation field.
- Tap the Attach icon.
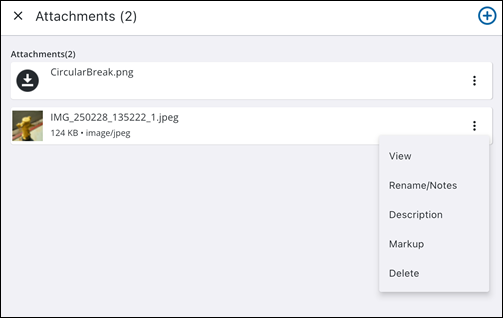
Any existing attachments appear.
- To add another attachment, tap the Add icon.
- Tap the More icon on an existing attachment to access more actions.
- More icon: Tap to view more actions.
- View: Tap to view the attachment.
- Done: Tap the attachment and tap Done to exit viewing.
- Rename/Notes: Tap to rename the attachment or add a note.
- X icon: Tap to remove the current attachment name.
- Tap the field to enter a new name or add a note.
- Rename: Tap to save the new attachment name.
- Description: Tap to add a description.
- Tap the field to enter a description.
- Update: Tap to update the description.
- Markup: Tap to use markup tools to mark the image with annotations.
- Color picker icon: Tap to change the markup color.
- Draw on the attachment to mark it up.
- Undo: Tap to undo the markup.
- Save: Tap to save the markup.
- Delete: Tap to delete the attachment.