Add a Utility Network Layer
Add a Utility Network Layer to support network tracing functionality. Asset groups and asset types from the accompanying feature service can be traced when associated with the Utility Network Layer.
- Click the Service Resources tab.
- Click Add record on the Service Resources panel.
- Enter a Name for the service.
- Select Utility Network Layer from the Service Type drop-down list.
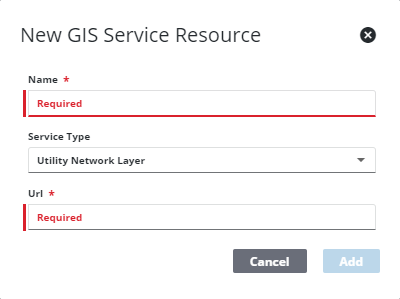
- Enter the URL of the service. The URL is a combination of two URLs from an Esri Utility Network GIS service. First, copy the URL of the Utility Network service (ending in /UtilityNetworkServer), then locate the layer ID of the utility network layer in the FeatureService in the same folder of the ArcGIS Services Directory. Copy the layer ID from the URL and add it to the base URL (for example, .../UtilityNetworkServer/12).
- Click Add.
 TIP: You can filter the list of records displayed. See Filter Records for more information.
- Select the new resource from the Service Resources panel to finish entering the Resource Details.

The Id, a unique number assigned to the service resource, appears to the right of the resource Name.
- Select the Security Type, either No Security, OAuth2 App, OAuth2 User, or Token.
See Configure Service Resource Security for more information on security types.
Once the Utility Network Layer is added, you can configure network tracing on the Utility Network page. See Utility Network for more information.
 NOTE: Changes are automatically saved and verified by a notification at the bottom of the page.

