Asset Details Page Fields
The following fields are found on the Assets and Work Activities panels on the Asset Details page.
 NOTE: Some fields or panels are hidden by default. Use Style to control which fields and panels are hidden or displayed. See Appendix 2: Fields and/or Panels Hidden by Default in the Style Guide for Trimble Unity Maintain and Trimble Unity Permit for more information on specific fields or panels that can be revealed or hidden.
The Assets panel shows information concerning assets selected from the map.
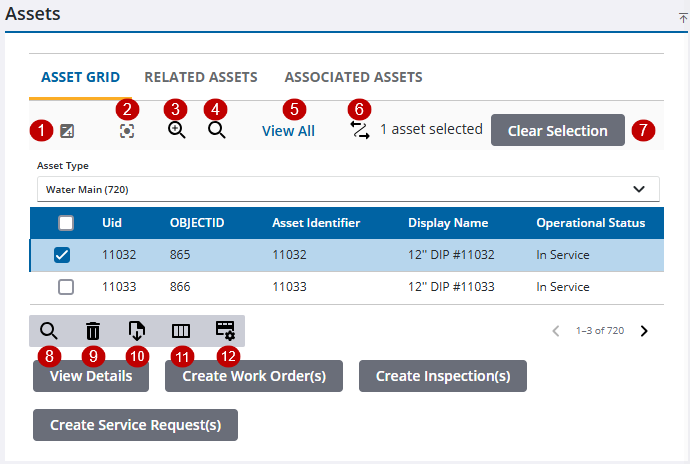
- Invert Selection: Click to switch between selected assets.
- Center Map: Click to center the map on all the assets in the list or if an asset is selected, center the map on the selected asset.
- Zoom On Map: Click to zoom to the selected assets on the map. If less than two assets are selected, the map will center on the assets.
- Lookup Assets: Click to open the Lookup Assets panel and search for assets by the asset type, UID, or the entity identifier.
- View All/By Type: Click to change how the assets are displayed on the panel. Click View All to display all the assets selected on the map. Click By Type to display the assets by Asset Type.
- Equipment Change Out: Click to open the selected assets in Equipment Change Out.
- Clear Selection: Click to clear all of the selected assets on the map and on the panel.
- Filter records: Click to quickly filter the list of fields in the panel.
- Delete selected records: Click to remove assets from the Assets panel.
- Export CSV: Click to export assets selected on the map to a .csv file.
- Column Menu: Click to modify the columns shown on the panel.
- Rows: Click to change the number of rows viewed at a time in the panel.
The Work Activities panel shows information concerning event layers selected on the map.
- Invert Selection: Click to switch between selected assets.
- Center Map: Click to center the map on all the assets in the list or if an asset is selected, center the map on the selected asset.
- Zoom On Map: Click to zoom to the selected assets on the map. If less than two assets are selected, the map will center on the assets.
- Activity Type: The type of work activity, such as work orders, displays. Click the drop-down list to switch between the work activities selected on the map.
- Filter records: Click to quickly filter the list of fields in the panel.
- Delete selected records: Click to remove assets from the Assets panel.
- Open Activities: Click to open any selected work activities.
The GIS Alerts tab shows information regarding any alerts added to an asset.
- ID: Automatically populates with a unique ID and cannot be changed.
- Code: A code identifying the alert with a short name.
- Description: A description defining the alert in more detail.
- Severity: The importance of the alert which determines the background color of the alert on the work activity.
- Date Applied: Automatically displays the date and time the alert was added to the asset.
- Date Completed: Automatically displays the date and time the alert was completed.
- Notes: Any additional information concerning the alert.
- Filter records: Click to quickly filter the list of fields in the panel.
- Complete GIS Alerts: Click to mark the alert as complete.
- Add record: Click to add a GIS alert to the selected asset.
- Column Menu: Click to modify the columns shown on the panel.
- Alert Type: Select the alert you want to add to the selected asset.
- Severity: Select the importance of the alert which determines its background color.
- Notes: Enter any additional information concerning the alert.
- Display: Select the check box to display the alert(s) across the top of the work activity.
- Visible in PA: Select the check box to display the alert(s) in Public Access.

