Add a Fee
This section discusses how to set up new fees and explains the different kinds of fees that can be added.
|
|
 PREREQUISITES:
 NOTE: Multiple records can be added or edited at the same time. See Perform a Bulk Export or Bulk Import for more information.
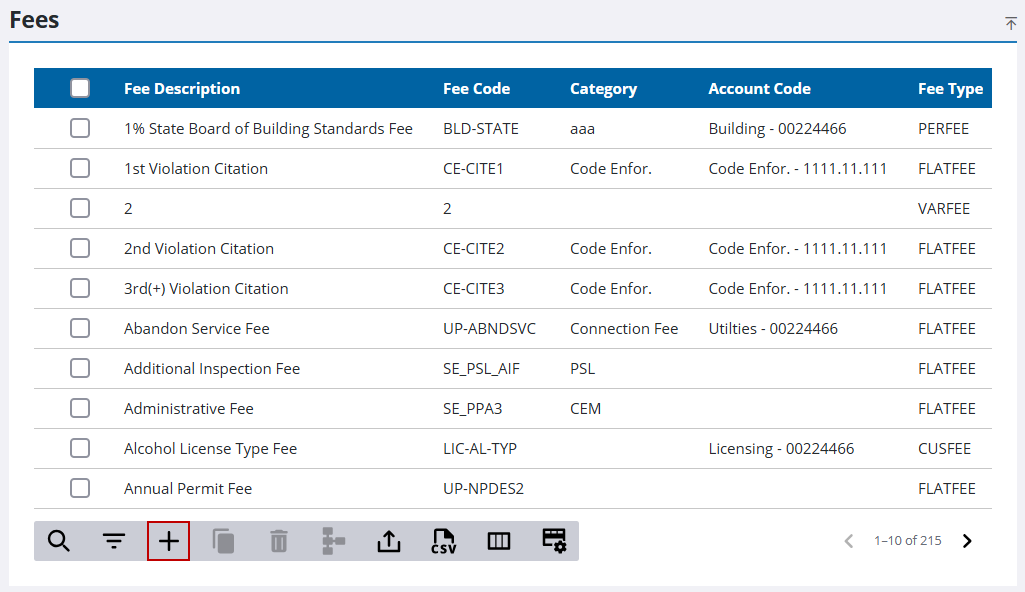
- From the home page, click Permitting and click Fee Setup.
- On the Fees panel, click Add record.
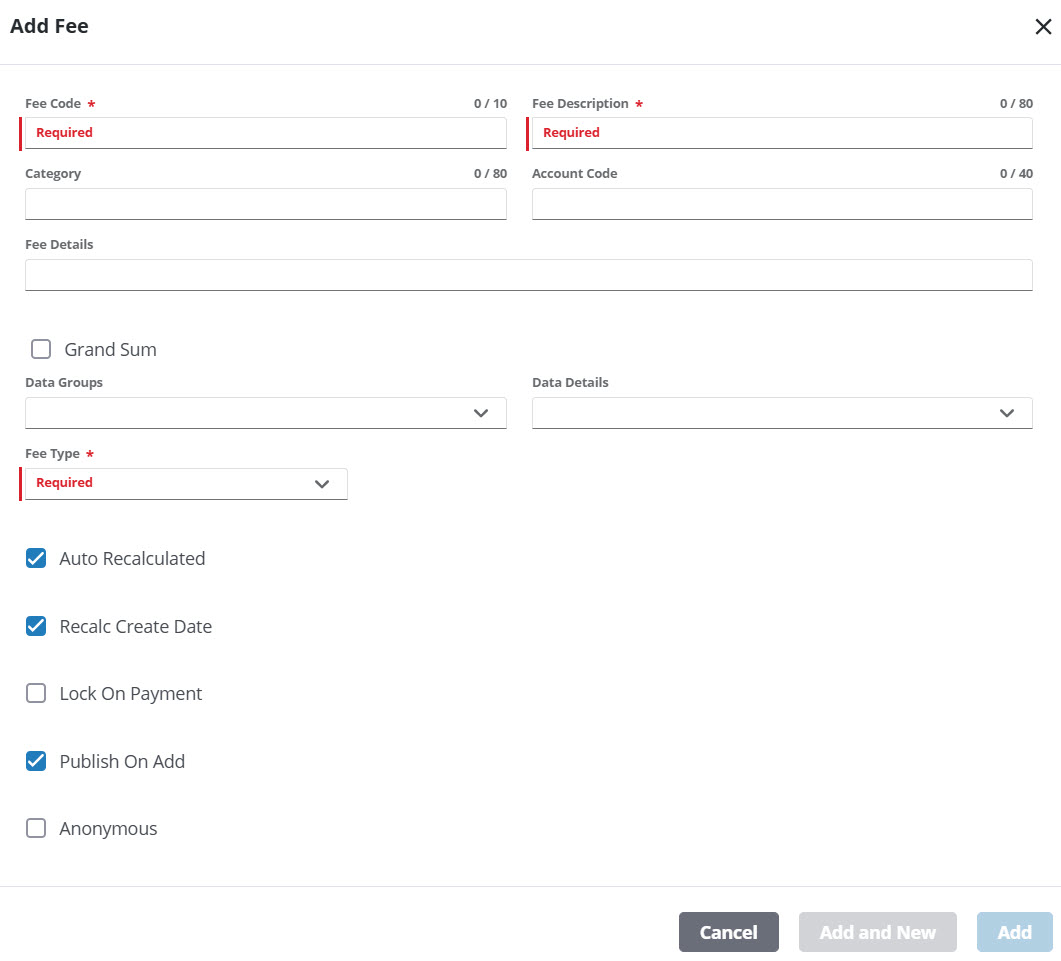
- Enter a 10-character (maximum) name in the Fee Code field.
- Enter a brief explanation of the fee in the Fee Description field.
- Enter a Category, if desired. A category is an optional organizational tool.
- If desired, enter the account number the fee is paid toward in the Account Code field. An update to the Account Code does not affect existing records.
- Enter Fee Details if desired. Fee details is for additional information not mentioned in the Fee Description.
- Select the Grand Sum check box if you want the value used to calculate the fee to be linked to the Grand Sum field on the Case Data panel of the permit.
- Select a data group from the Data Groups drop-down list to add it to the fee.
- Select a data detail from the Data Details drop-down list to add it to the fee.
- Select the Auto Recalculated check box if you want the fee to be recalculated every time the form is opened.
- Select the Recalc Create Date check box to calculate the fee based on the fee structure that was in place on a given date.
If this check box is not selected, the fee is calculated using the current fee structure.
|
A case was created on December 15, 2016, but the organization implemented a new fee structure on January 1, 2017. If the Recalc Create Date check box is selected and the administrator opens the case on January 23, 2017, the fees do not change because this setting ensures that the fees are calculated using the fee structure that was in place on the day the case was created. |
 EXAMPLE
If the Recalc Create Date check box is not selected and the administrator opens the case on January 23, 2017, the fees are recalculated based on the new fee structure.
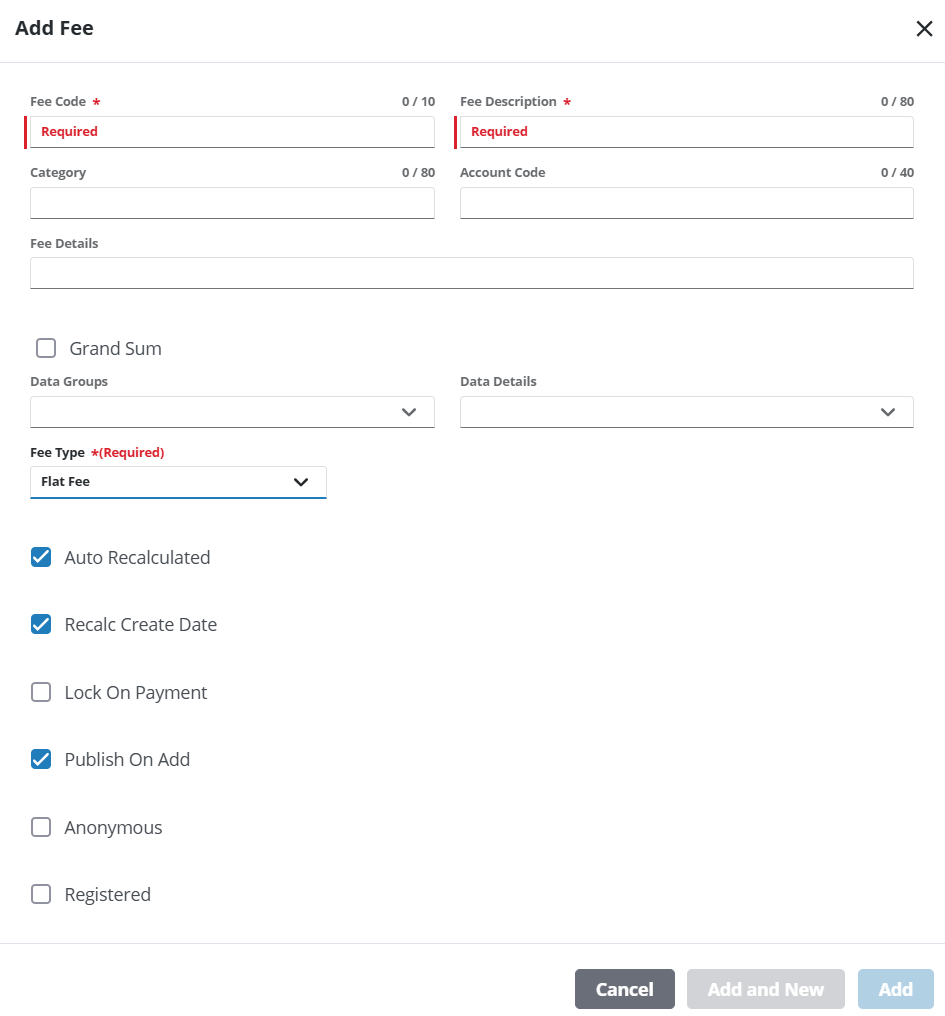
- Select the Lock On Payment check box to ensure that a fee amount does not change once a payment is made on that fee even if the payment is only a partial payment.
NOTE: This is a per-fee basis, so administrators can set this for each individual fee if desired.
NOTE: If the fee is refunded in full, the fee amount is unlocked.
- The Publish On Add check box is selected by default making the fee visible in Public Access when added to a case.
- Select the Anonymous and Registered check boxes if the fee can be added to cases created in Public Access by guest users and registered users respectively.
 IMPORTANT: If the Anonymous or Registered check boxes are not selected, the fee is not added to cases created in Public Access.
A flat fee is a single, fixed amount. It follows this formula:

The Factor is always 1, so the Rate is equal to the amount of the fee.
- Select Flat Fee from the Fee Type drop-down list.
- Enter a date in the Effective date field, or click the calendar icon to select a date.
- Enter 1 in the Factor field.
- Enter the rate in the Amount field.
- Click Add or Add and New to add the fee and create another one.
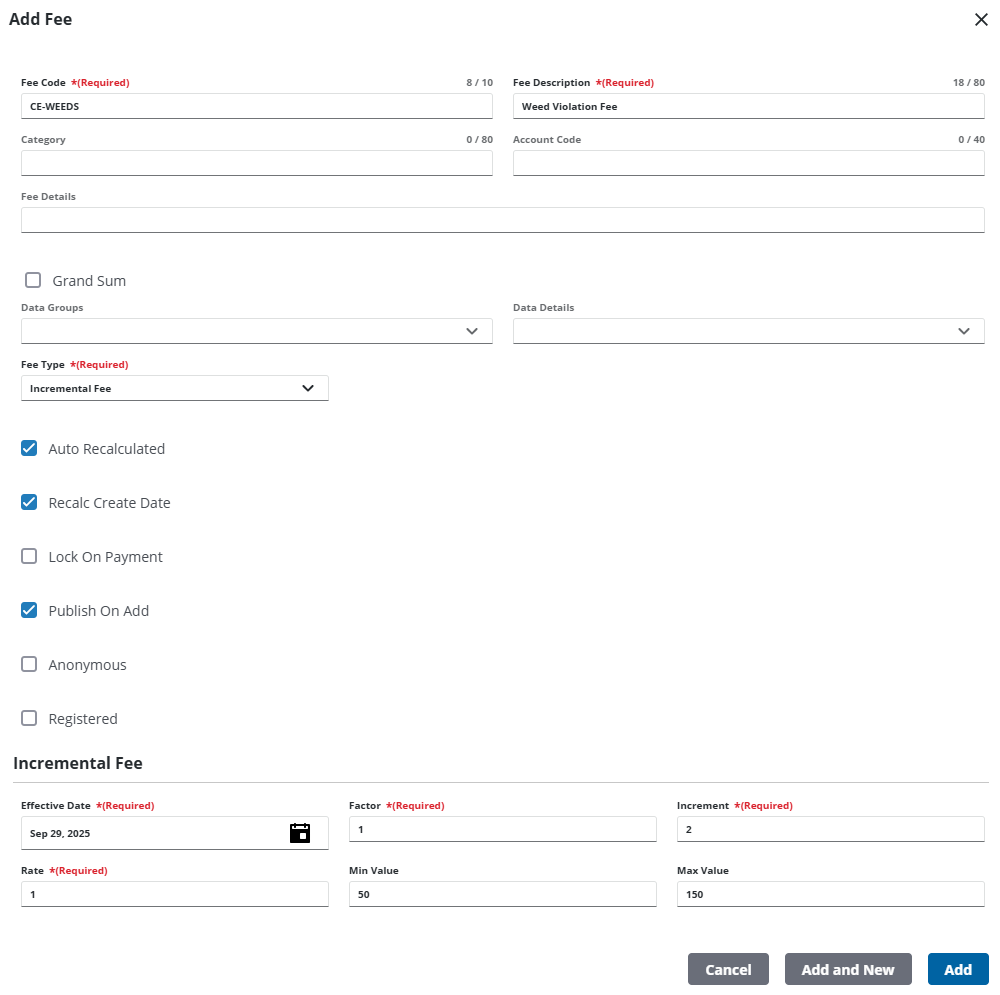
An incremental fee is based on a set number of increments or units. Partial increments or units are rounded up to the next full increment. The Fee Type is used to calculate X dollars per increment, such as $10 per linear foot, $150 per yard, etc. The formula for this fee is:

The Quantity is the number entered by the end user in a linked data group or data field. The Increment is the per-unit used in determining the cost, and the Rate is the per-unit cost.
|
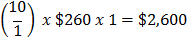
The impact fee for fire and emergency services for a townhouse or duplex is $260 per housing unit. The Fee Code is linked to the R-TOWNDUP data field. End users enter the number of units in this box on the Case Data panel, and the fee code uses that value to calculate the amount. The increment is 1, and the rate per increment is 260. Therefore, a building permit for 10 townhouses would pay a fee of $2,600. |
The equation is:
- Select Incremental Fee from the Fee Type drop-down list.
- Enter a date in the Effective date field, or click the calendar icon to select a date.
- Enter 1 in the Factor field.
- Enter a value in the Increment field.
- Enter the amount of increase per increment in the Rate field.
- Enter an amount in the Min Value field. If the calculated value of the fee is less than the value in this field, this value becomes the default fee amount.
- Enter an amount in the Max Value field. If the calculated value of the fee is greater than the value in this field, this value becomes the default fee amount.
- Click Add or Add and New to add the fee and create another one.
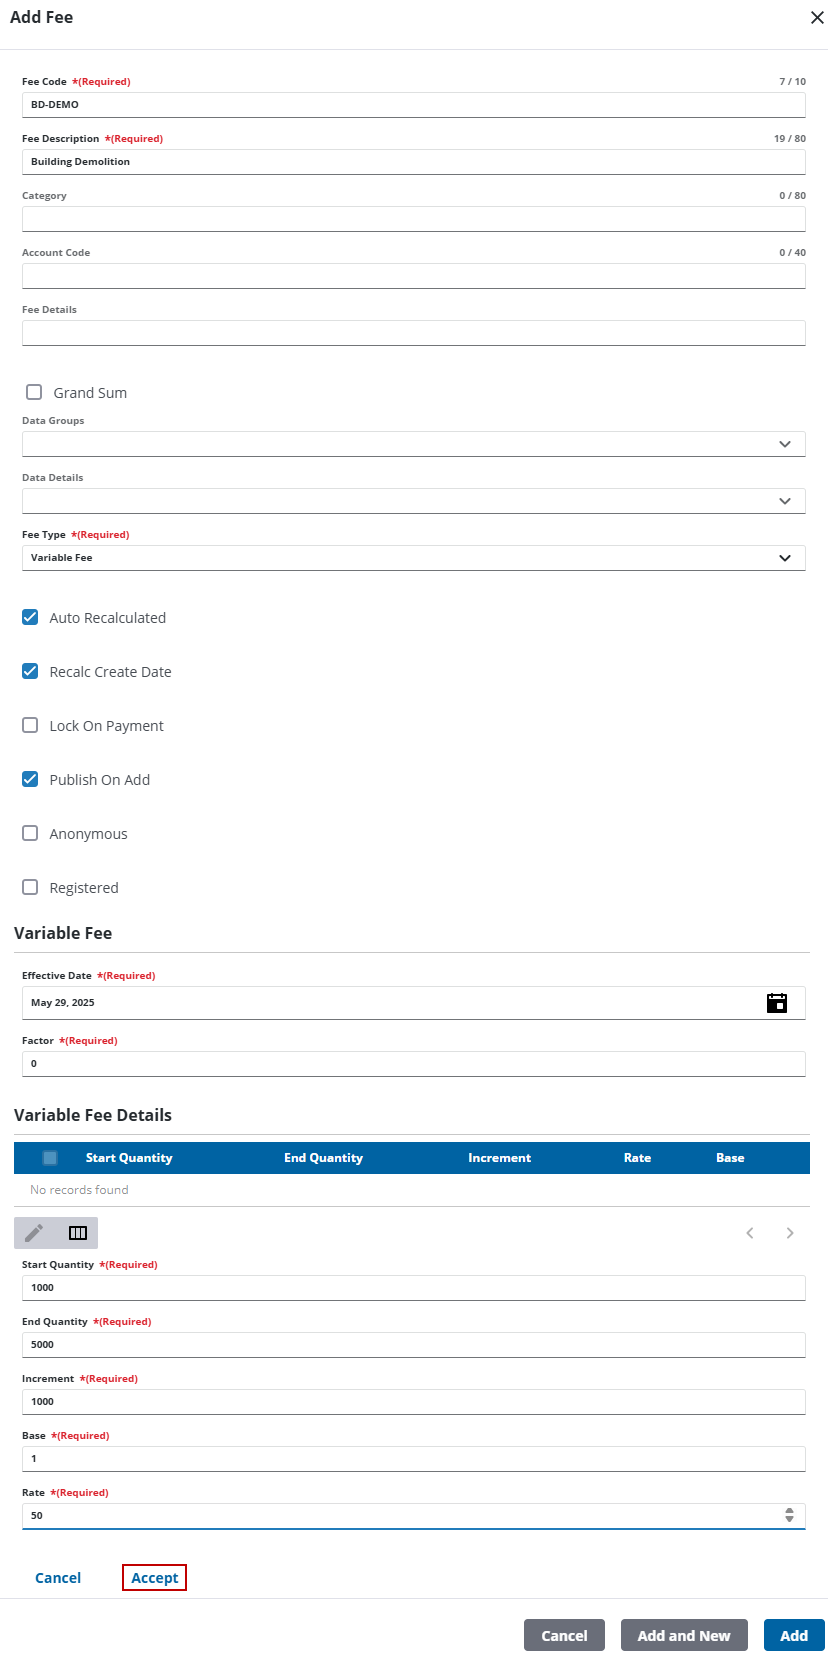
A variable fee is based upon a set of variables: Start Quantity, End Quantity, Increment (units), Rate, and Base. The variable fee type is typically used for complex fee schedules involving multiple milestones where different base rates and per increment rates apply. For example, a fee schedule could include a per-unit fee plus a base rate. The formula for this fee is:

NOTE: End Quantity is the milestone at which the new fee schedule begins.
The variable fee type can combine the incremental fee type with a base rate.
|
Consider an electrical inspection fee for commercial buildings. The fee schedule is $0.03 per square foot of total new construction square feet plus a $60 base fee. The fee code is linked to the C-PRJSQFT data field. The fee for a new commercial building of 10,000 square feet is calculated as follows: the end user enters 10,000 in the C-PRJSQFT field in the case data panel of the permit. This value is the Quantity variable in the equation. Therefore, the completed equation looks like this:
The End Quantity is set to 1,000,000,000 (one billion). This is essentially infinity and means the fee is set at $0.03 per square foot with no cap on square footage. Always use a large enough number to account for all potential scenarios. We can safely assume no one will apply for a permit to build a one billion square foot building. |

The variable fee type can also accommodate a tiered fee schedule involving ranges of values where different fees and base rates apply.
The following fee schedule is for a police impact fee for commercial buildings based on the square footage of the building. The fee is linked to the C-OFFINST data field. The Start Quantity and End Quantity are the range in which the fee applies, the Increment is the unit used in the fee calculation, the Rate is the per-unit rate that applies to the range, and the base is the base rate added to the per-unit calculation. Thus, the fee for a 20,000-square foot building would be:

The fee schedule configured in the preceding formula above is:
- $536 per 1,000 square feet for buildings 0–25,000 square feet
- $339 per 1,000 square feet for buildings 25,001–50,000 square feet
- $191 per 1,000 square feet for buildings 50,001–100,000 square feet
- $162 per 1,000 square feet for buildings greater than 100,001 square feet
NOTE: The end quantity on this line is 1 billion, which accounts for everything over 100,000 square feet.
The base variable in this example is zero and makes the per-unit calculation of $10,720 the primary fee. Conversely, setting the rate variable to zero would make the per-unit calculation zero which in turn makes the base fee the appropriate dollar amount.
Another example is a tiered fee schedule with a per-unit rate plus base rate and base rate with no per-unit rate.
|
This example of a commercial zoning compliance fee for new commercial buildings combines the different calculation methods and highlights the flexibility of the variable fee type. The fee schedule is $100 plus $2 per 100 square feet for buildings over 5,000 square feet. For buildings under 5,000 square feet, the fee is just $100. The fee code is linked to the C-PRJSQFT data field. The first line of the fee shows that values up to 5,000 do not have a rate. When the rate variable is zero, this zeroes out the per-unit fee and the base rate becomes the fee. Thus, the fee formula for a 2,000-square feet building is:
The second line of this fee is applied when values greater than 5,000 square feet are entered in the related data field. The increment is 100, which accounts for the per-100 square feet in the fee schedule. The rate per-unit is $2. The base is $100. Thus, the fee for a building that is 12,000 square feet would be:
|


In the preceding example, the fee schedule needs to account for the total square footage once the 5,000 square feet milestone is reached.
If the $2 per 100 square feet is to be applied to the total square footage of the building (once the 5,000 square feet milestone is met), then the second line item in the fee code needs to account for that total. This is accomplished by rolling up those costs and adding them to the base fee in the line item.
- Calculate the per-unit cost for the first 5,000 square feet.
- (5000/100) x $2 = $100.
- The $100 is the total per-unit fee of the first milestone.
- Add this $100 to the base fee on the second milestone.
- The second milestone’s base fee is now $200, rather than $100.
- The $200 base fee accounts for the $2 per 100 square feet for the first 5,000 square feet of the building and the $100 regular Base fee.
- Check the math.
- Accounting for all 12,000 square feet, the equation is:
- ((12,000-5,001)/100 x $2) + $200 = $340
The completed configuration looks like the following:
IMPORTANT: If there were more milestones, the per-unit rate for each previous milestone would need to be "rolled up" and added to the base fee of the milestone range. It is a best practice to keep detailed notes and consider breaking the fee schedule into a combination of flat fees and variable fees to keep it simple.
The variable fee type is the most dynamic of the fee types. Nearly any fee schedule can be accommodated using the method it provides. However, it is very important to keep it as simple as possible. Tricking the system to calculate the correct fees is okay as long as it is thoroughly documented. Otherwise, when it is time to update the fees, you will have no idea what was done previously.
- Select Variable Fee from the Fee Type drop-down list.
- Enter a date in the Effective date field, or click the calendar icon to select a date.
- Enter 1 in the Factor field.
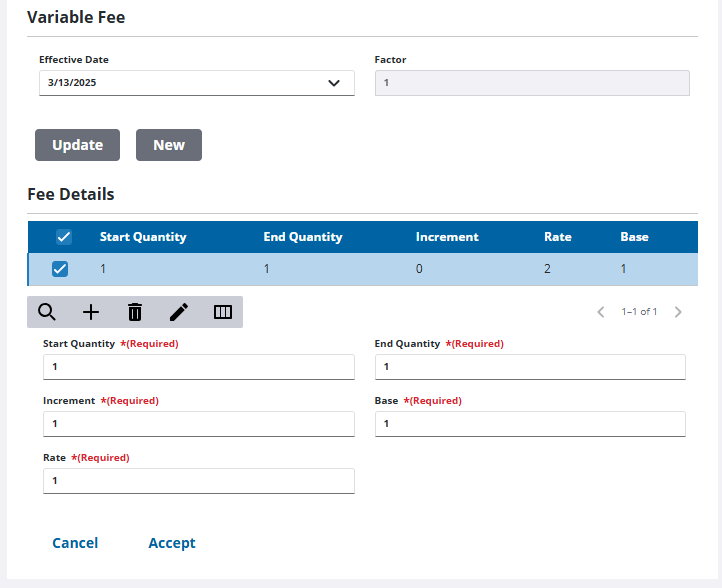
- Enter the start and end quantities in the respective fields.
- Enter the desired value in the Increment field.
- If applicable, enter the value that the calculated fee is added to in the Base field.
- Enter the amount of increase per increment in the Rate field.
- Click Accept.
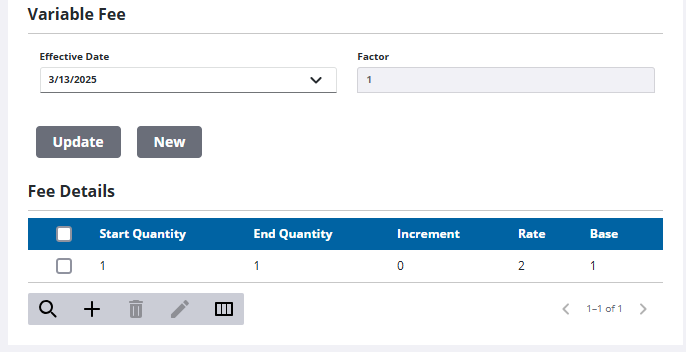
The variable fee is added to the Variable Fee Details section.
- Repeat the steps to add more variables fees if needed.
- Click Add or Add and New to add the fee and create another one.
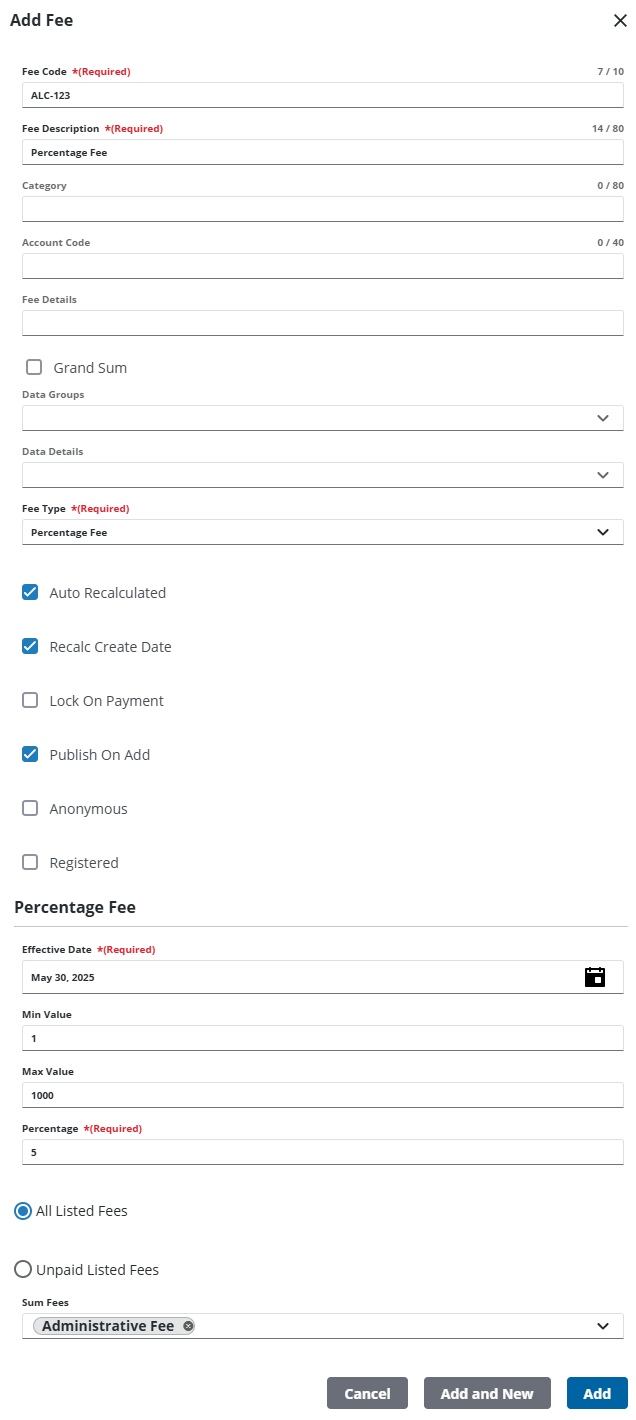
A percentage fee is a percentage of the sum of selected fees on the permit. The Grand Sum, Data Group Code, and Detail Code fields on the Add Fee panel should be left blank.
|
|
The Percentage field is the total percentage of the fee totals from the fee codes applied to this fee.
NOTE: Only the fees that are added here are included in the calculation of the percentage fee. Therefore, when adding new fees, be sure to update the percentage-based fees as well.
- Select Percentage Fee from the Fee Type drop-down list.
- Enter a date in the Effective date field, or click the calendar icon to select a date.
- Enter an amount in the Min Value field. If the calculated value of the fee is less than the value in this field, this value becomes the default fee amount.
- Enter an amount in the Max Value field. If the calculated value of the fee is greater than the value in this field, this value becomes the default fee amount.
- Enter a numerical value in the Percentage field.
- Select ALL Fees or Unpaid Fees to indicate which fees to use when calculating the percentage fee.
IMPORTANT: Adding the same percentage fee to its own setup is known to cause miscalculations. For example, if there is a 3% tax fee, including the 3% tax fee in the calculation causes problems.
- Select the desired fees from the Sum Fees drop-down list.
- Click Add or Add and New to add the fee and create another one.
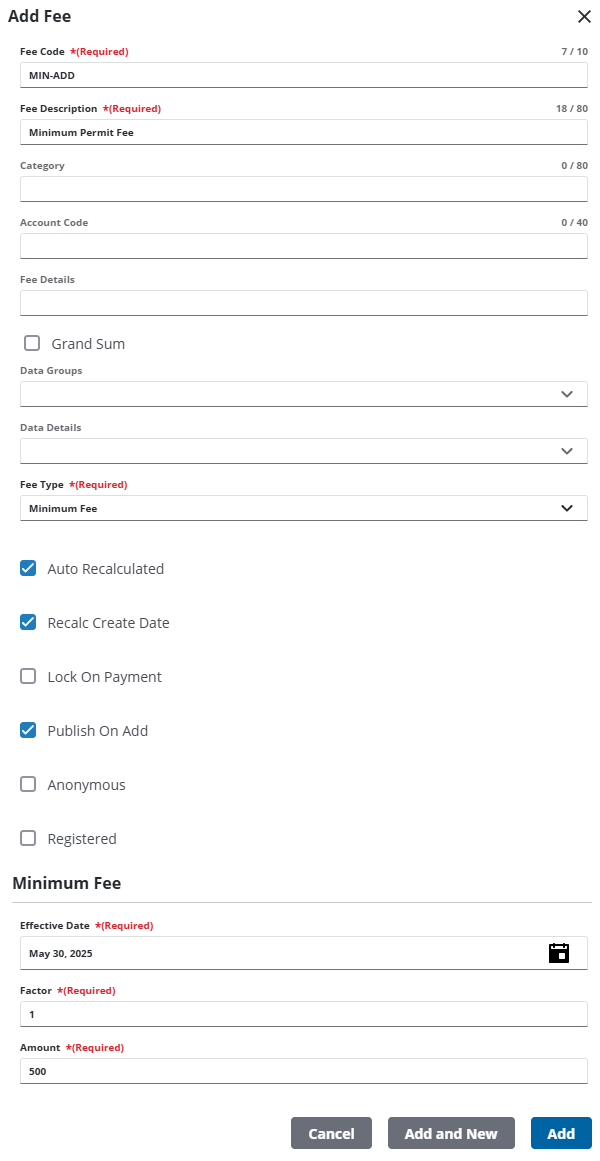
A minimum fee is used in conjunction with one or more other fees. The sum of all the calculated fees on the permit must total at least the set minimum fee amount.
|
For a $200 minimum fee, if the total of all other fees on the permit equals $190, then the minimum fee applied is $10 ($190 + $10 = $200). If the total of all fees equal $200 or more, no additional minimum fee is necessary. |
NOTE: When configuring a minimum fee, the Grand Sum, Data Group Code, and Detail Code fields on the Add Fee panel should be left blank.
- Select Minimum Fee from the Fee Type drop-down list.
- Enter a date in the Effective date field, or click the calendar icon to select a date.
- Enter a value in the Amount field.
- Click Add or Add and New to add the fee and create another one.
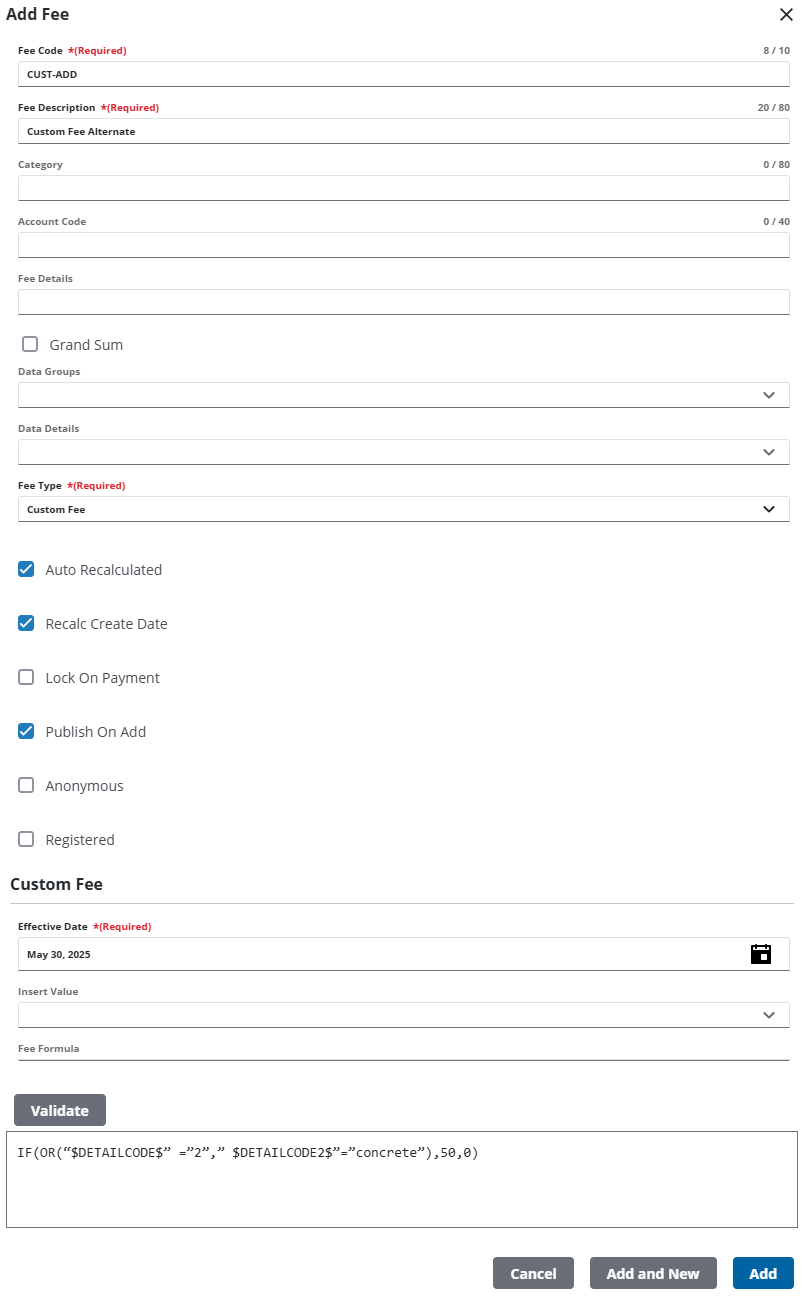
Custom fees give users the option to design new fee formulae to meet unique needs. However, predefined fees suffice in most situations, and it is recommended that they be used when possible.
IMPORTANT: Custom fees should always be kept as simple as possible, using as few case data details as possible, and should only be used by advanced users. Furthermore, custom fees should be thoroughly tested before being deployed in a production environment. As formulae become more complex, the likelihood of incorrectly defining a fee increases significantly. Custom fees should not be used as a substitute for properly configuring individual case templates or multiple fees. Creating complex custom fees can severely inhibit the performance of the software.
Custom fees are intended to be used with case data (data sum, data groups, data details). The values (or variables) within the case data can be used as input variables in formulae.
The supported operators for custom fees are:
- Basic math and arithmetic (addition, subtraction, multiplication, and division)
- Conditional "IF" functions
- Logical "AND" and "OR" operations
The supported variable types are:
- Case data details: Number, Value, Text, Comment, Yes/No, List, and Q1xQ2xQ3
- Case data group: Sum
|
Writing custom fees with proper syntax:
|
- Select Custom Fee from the Fee Type drop-down list.
- Enter a date in the Effective date field, or click the calendar icon to select a date.
- Enter the formula in the Fee Formula field, using the Insert Value drop-down list to enter the values drawn from case data fields. As you type, a list of logical operators appear for optional selection.
IMPORTANT: The Insert Value drop-down list is populated based on the Data Group Codes and Detail Codes selected on the Add Fee panel. If those fields are left blank, the Insert Value drop-down list will be empty.
NOTE: Trimble Unity Maintain only allows two parameters when using the AND operator, which means that if more than two are needed then AND needs to be nested. For example:
IF(AND($[BD-HVAC]DWELUNNO$=0,AND($[BD-HVAC]NUMHVAC$=0,AND($[BD-HVAC]NUMVAV$=0,AND($[BD-HVAC]NUMCOOLER$=0,AND("$[BD-HVAC]NORDUCTS$"="Y",$[BD-HVAC]NUMCEH$=0))))),100,0)
- Click Validate to automatically test your formula.
- Click Add or Add and New to add the fee and create another one.
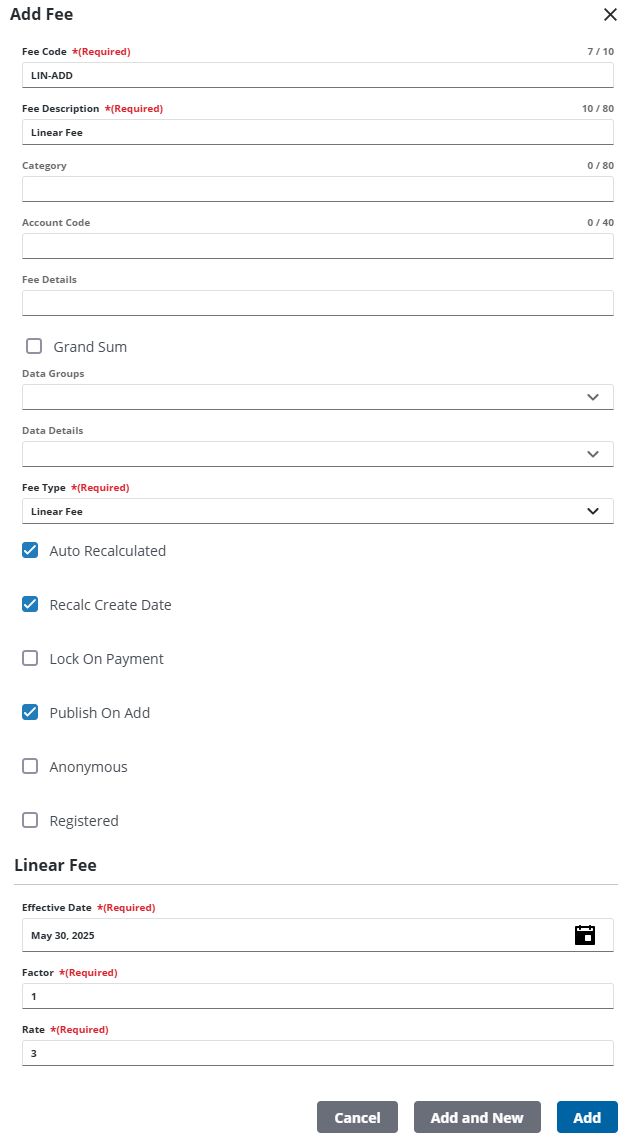
A linear fee is calculated by multiplying the rate with the value. The linear fee is simple. The formula for this fee is:

The equation is:
|
It is important that the data group or box provides descriptions on what the end user should enter. If the sidewalk frontage for a permit was 100 feet, then the fee would be $50.
|

- Select Linear Fee from the Fee Type drop-down list.
- Enter a date in the Effective date field, or click the calendar icon to select a date.
- Enter 1 in the Factor field.
- Enter a amount owed per unit from the data group in the Rate field.
- Click Add or Add and New to add the fee and create another one.
NOTE: The Review Config panel provides visibility of where a selected data item (such as a case type, user, status code, or other Trimble Unity Permit item) is being used. See Review Permit Configurations for more information.

