Select Floor Tool
Floor-aware web maps allow you to efficiently view and manage work activities in large, complex indoor environments such as plants, warehouses, or municipal buildings. The Select Floor tool can be used in conjunction with ArcGIS Indoors and Trimble Unity to filter floor plan data displayed on the map for a building or a floor within the building.
The Select Floor map tool appears when the app automatically detects a floor-aware map and allows you to isolate GIS content by Facility Id and Level Id.
- Level Selection: Selecting a level filters the map to show only assets and work activities assigned to that specific Level Id.
- Automatic Display: When you open a work activity or form from a floor-aware map, the map automatically navigates to the corresponding building and level.
 NOTE: On floor-aware web maps, viewing an activity or asset (such as tapping the Map icon or the Zoom icon) automatically centers the map on the building and switches the view to the corresponding level.
To view and interact with GIS data in real-time based on your current location in the field, you must configure a floor-aware web map in Trimble Unity Admin.
|
|
 PREREQUISITES:
- In Admin, click GIS.
- Click GIS Services.
- Click the Service Definitions tab.
- Select the relevant floor-aware web map service definition.
- To add a new map service, click the add icon on the Map Services panel.
- Select the Service and click Add. You can filter the list by typing the first few letters of the service in the search field.
The new service appears in the Map Services panel.
- Use the drop-down list to change the service, if desired.
- To change the order of the services, click the reorder icon to the left of the Service drop-down list and drag it to the desired location. The first map in the list will be the default map for the app.
 IMPORTANT: The order of these services is important because the first layer is the default map in the app, and the services draw in the order that they appear in this panel, meaning the first layer draw on top, the second layer below that and so on. More transparent layers, like asset layers, should be placed at the top and more solid layers, like world imagery and TPK files, should be at the bottom so they don't cover up other layers.
- Select Is Active to activate a service. If Is Active isn't selected, the service remains inactive.
- Enter the Refresh interval (number of seconds) to indicate how often you want the service refreshed.
- Select Sync Feature Layers in Mobile to allow the mobile apps to download sync-enabled feature services, including those in web maps, for offline use. The feature service can either be read-only, or editable (any changes made are synchronized once connected to the internet) depending on how your geodatabase is set up.
- Select the desired uses for this service: Plugins and Mobile.
- To configure multiple web maps, repeat steps 6-13.
- Define which domains, groups, and employees are associated with the service definition.
- Perform a configuration sync in Trimble Unity Field to pull down the latest changes. See Configuration Sync for more information.
See Configure GIS Services, Add Services to a Service Definition,and Associate Domains, Groups, and Employees to a Service Definition in the Admin Guide for Trimble Unity Maintain and Trimble Unity Permit for more information.
You can use the Select Floor tool on a floor-aware web map.
- With a floor-aware web map selected, tap the Select Floor tool on the map.
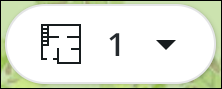
The Select Floor panel opens.
- Select a floor.
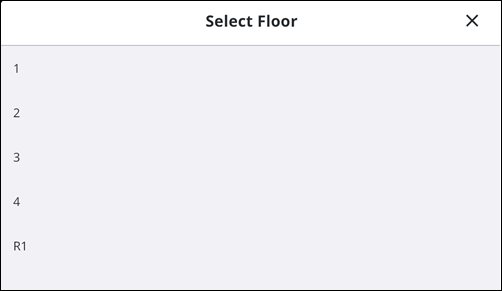
The map centers and navigates to the selected site or building, and displays only the assets, work activities, and layers associated with the selected level.
When working with floor-aware web maps, you can use the Select Floor tool to precisely locate activities in a multi-level environment. Creating an activity while a floor is selected automatically associates the record with that specific level.
- Tap the Add icon.

The Add panel opens.
- Tap the desired work activity to create.
- Select an Asset Group.
- Select an Asset Type.
- Select a work activity Template.
The Create Work Activity panel appears.
- Tap the desired work activity to create.
- Tap Location.
The Location page opens.
- Tap Map.
- Tap the Select Floor tool.
The Select Floor panel opens.
- Select a floor.
The map centers and navigates to the selected building, and displays only the assets and feature layers for the selected floor.
- Tap Add Location.
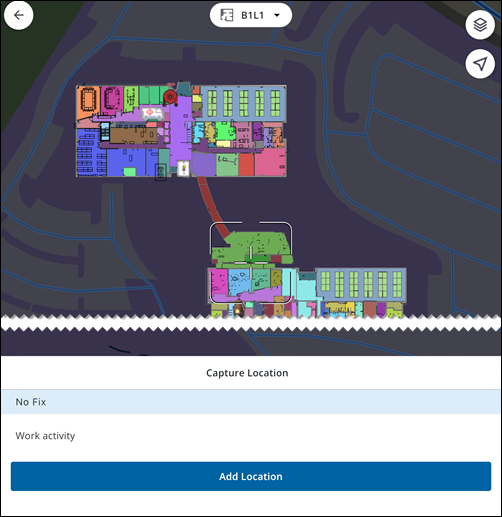
The Facility Id and Level Id automatically populate based on your selection in the Select Floor tool.
- Tap Done.
- Tap Save.
The work activity is created and assigned the vertical location IDs of the selected level, ensuring it appears correctly when the Select Floor tool is used in the future.

