Create an Attached Custom Inspection
An attached inspection includes a feature from the map. There are multiple ways to create an attached custom inspection.
- Open the map.
- Use the Legend tool to set map layers as selectable. See Legend for more information.
- Select assets on the map.
- Use the Asset Details page to refine the selection if needed. See Asset Details for more information.
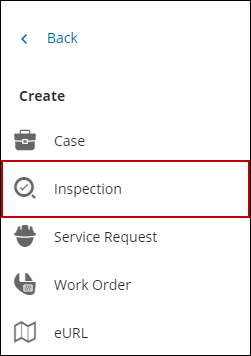
- Click Create from the menu.
- Click Inspection.
 TIP: You can filter the list of records displayed. See Filter Records for more information.
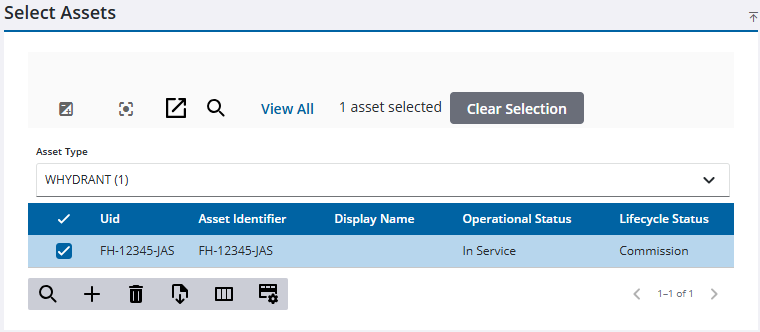
- Select the desired asset(s) to create inspections for. If you select multiple assets, an inspection is created for each asset.
 NOTE: By default, all the assets are selected in the Select Assets panel. Clear the check box next to any assets that you do not want to attach to the inspection. Click Clear Selection to clear all the check boxes for the selected assets.
The Entity Group and Entity Type fields automatically populate.
- Select Feature, Object, or Other.
- Select the inspection Template.
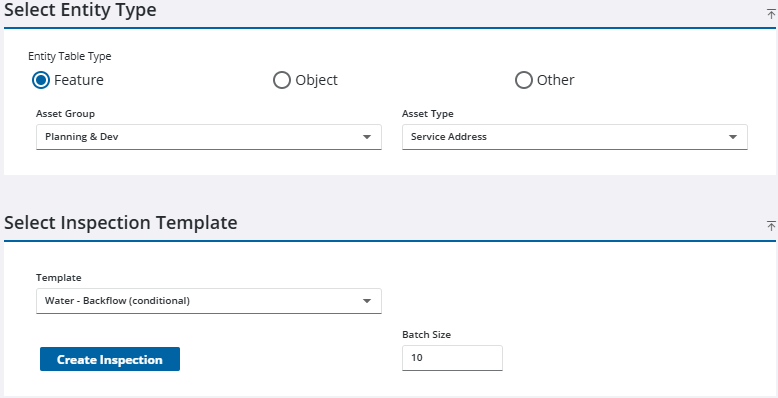
The Open Work Activities panel displays if the selected assets have any open records attached to them.
- Click Create Inspections.
- Open a service request.
- Navigate to the Related Activities page from the Service Request drop-down list.
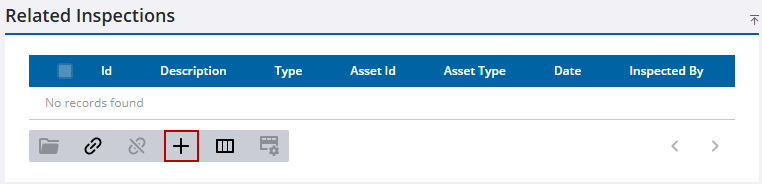
- Click Create linked activity from the Related Inspections panel.
The Create Inspection page opens. If you want to create an inspection with no asset attached, see Create an Unattached Custom Inspection for more information. If you want to attach an asset to the inspection, complete the following:
- Add assets from the map or by a UID. See Add Assets for more information.
TIP: You can filter the list of records displayed. See Filter Records for more information.
- Select the desired asset(s) to create inspections for. If you select multiple assets, an inspection is created for each asset.
NOTE: By default, all the assets are selected in the Select Assets panel. Clear the check box next to any asset that you do not want to attach to the inspection. Click Clear Selection to clear all the check boxes for the selected assets.
The Asset Group and Asset Type fields automatically populate.
- Select Feature, Object, or Other.
- Select the inspection Template.
The Open Work Activities panel displays if the selected assets have any open records attached to them.
- Click Create Inspections.
- Open a work order.
- Navigate to the Related Activities page from the activity toolbar.
- Click Create linked activity from the Related Inspections panel.
The Create Inspection page opens. If you want to create an inspection with no asset attached, see Create an Unattached Custom Inspection for more information. If you want to attach an asset to the inspection, complete the following:
- Add assets from the map or by a UID. See Add Assets for more information.
TIP: You can filter the list of records displayed. See Filter Records for more information.
- Select the desired asset(s) to create inspections for. If you select multiple assets, an inspection is created for each asset.
NOTE: By default, all the assets are selected in the Select Assets panel. Clear the check box next to any asset that you do not want to attach to the inspection. Click Clear Selection to clear all the check boxes for the selected assets.
The Asset Group and Asset Type fields automatically populate.
- Select Feature, Object, or Other.
- Select the inspection Template.
The Open Work Activities panel displays if the selected assets have any open records attached to them.
- Click Create Inspections.
- Open the case.
- Navigate to the Case Related Activities page from the case summary menu.
- Click Create linked activity on the Related Inspections panel.
The Create Inspection page opens. If you want to create an inspection with no asset attached, see Create an Unattached Custom Inspection for more information. If you want to attach an asset to the inspection, complete the following:
- Add assets from the map or by a UID. See Add Assets for more information.
TIP: You can filter the list of records displayed. See Filter Records for more information.
- Select the desired asset(s) to create inspections for. If you select multiple assets, an inspection is created for each asset.
NOTE: By default, all the assets are selected in the Select Assets panel. Clear the check box next to any asset that you do not want to attach to the inspection. Click Clear Selection to clear all the check boxes for the selected assets.
The Asset Group and Asset Type fields automatically populate.
- Select Feature, Object, or Other.
- Select the inspection Template.
The Open Work Activities panel displays if the selected assets have any open records attached to them.
- Click Create Inspections.
- Add assets from the map or by a UID. See Add Assets for more information.
- Click Create Inspections on the Assets panel.
The Create Inspection page opens. If you want to create an inspection with no asset attached, see Create an Unattached Custom Inspection for more information.
TIP: You can filter the list of records displayed. See Filter Records for more information.
- Select the desired asset(s) to create inspections for. If you select multiple assets, an inspection is created for each asset.
NOTE: By default, all of the assets are selected in the Select Assets panel. Clear the check box next to any assets that you do not want to attach to the inspection. Click Clear Selection to clear all the check boxes for the selected assets.
The Asset Group and Asset Type fields automatically populate.
- Select Feature, Object, or Other.
- Select the Template.
- Click Create Inspections.

