Create an Attached Work Order
An attached work order includes features from the map. When a work order is created, several panels show. The panels that show and any data automatically populated in them are configured by the administrator.
There are multiple ways to create an attached work order.
- Open the map.
- Use the Legend tool to set map layers as selectable. See Legend for more information.
- Select assets on the map.
- Use the Assets Details page to refine the selection if needed. See Asset Details for more information.
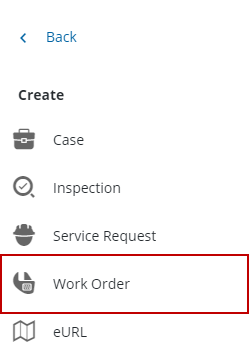
- Click Create from the menu.
- Click Work Order.
The Create Work Order page opens.
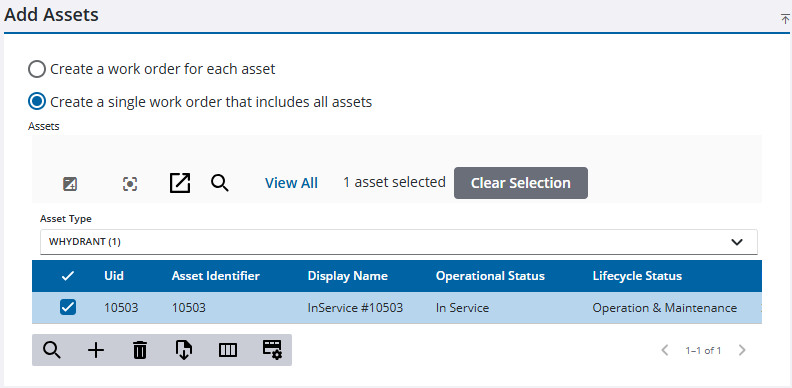
- Click Create a work order for each asset to create an individual work order for each asset selected. Click Create a single work order that includes all assets to create one work order for all the assets selected.
 TIP: You can filter the list of records displayed. See Filter Records for more information.
- Select the desired asset(s) from the Add Assets panel.
 NOTE: By default, all the assets are selected in the Add Assets panel. Clear the check box next to any assets that you do not want to attach to the work order. Click Clear Selection to clear all the check boxes for the selected assets.
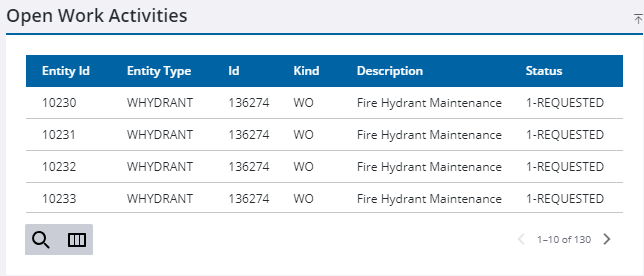
Any work activities that are open for the selected assets appear in the Open Work Activities panel.
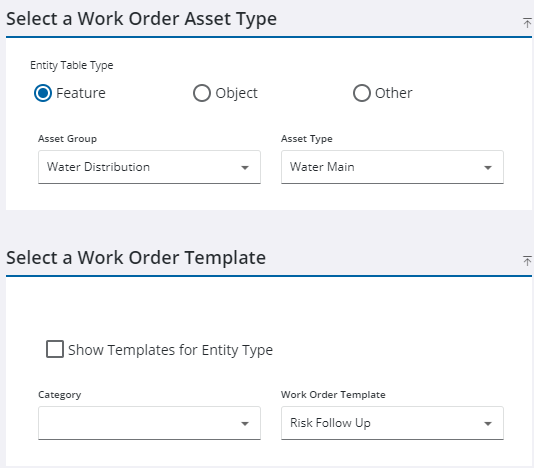
The Asset Group and Asset Type fields automatically populate in the Select a Work Order Asset Type panel.
- Select Feature, Object, or Other. While features or objects (related tables) are found in the geodatabase, the others category allows work order templates to be created on anything stored in the database.
- Select the Work Order Template in the Select a Work Order Template panel.
NOTE: Select a Work Order Category to further filter templates. It is set up on the template by the administrator. See Add or Edit a Work Order Template in the Admin Guide for Trimble Unity Maintain and Trimble Unity Permit for more information.
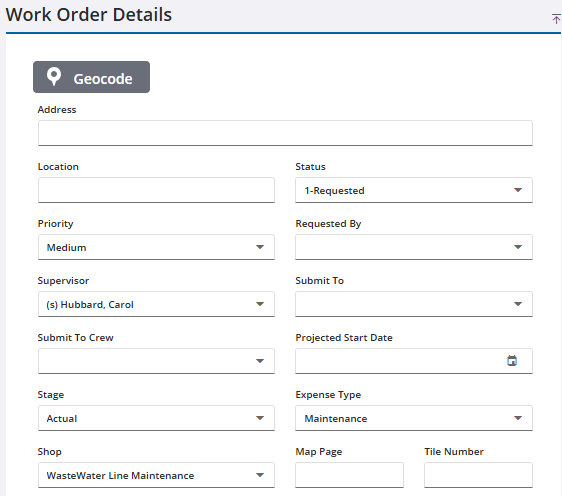
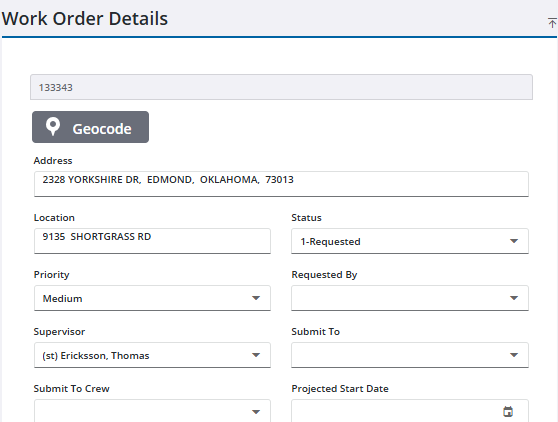
- Enter information in the Work Order Details panel.
NOTE: Some fields may automatically populate if your administrator has set it up to do so.
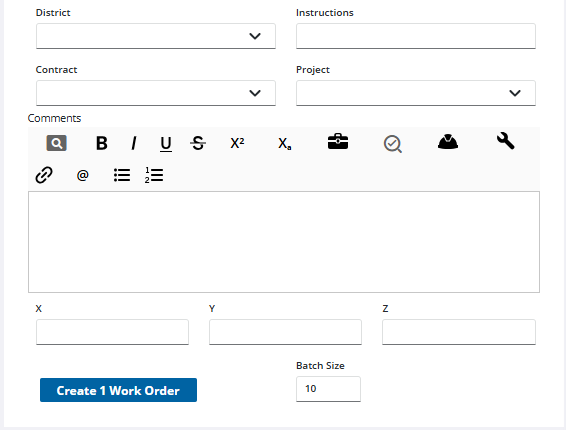
- Click Create Work Orders.
Once the service request has been investigated, if it is determined that further work is needed a work order can be created to track that work. Service request comments are copied to the work order.
- Open a service request.
- Navigate to the Related Activities page from the activity toolbar.
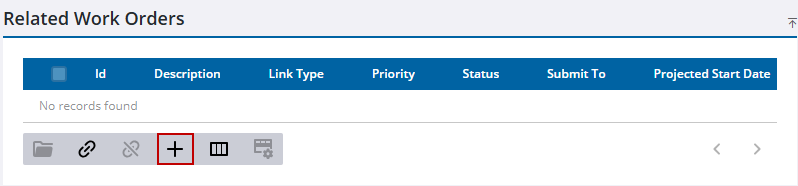
- Click the Create linked activity icon from the Related Work Orders panel.
The Create Work Order page opens. Any attached assets on the service request appear in the Add Assets panel.
If you want to create a work order with no assets attached, see Create an Unattached Work Order for more information. If you want to attach assets to the work order, complete the following:
- Add assets from the map or by a UID. See Add Assets for more information.
- If you've added assets, click Create a work order for each asset to create an individual work order for each asset selected in the Add Assets panel. Click Create a single work order that includes all assets to create one work order for all the assets selected in the Add Assets panel.
TIP: You can filter the list of records displayed. See Filter Records for more information.
- Select the desired asset(s) to create work orders for.
NOTE: By default, all the assets are selected in the Add Assets panel. Clear the check box next to any assets that you do not want to attach to the work order. Click Clear Selection to clear all the check boxes for the selected assets.
The Asset Group and Asset Type fields automatically populate in the Select a Work Order Asset Type panel.
- Select Feature, Object, or Other. While features or objects (related tables) are found in the geodatabase, the others category allows work order templates to be created on anything stored in the database.
- Select the Work Order Template in the Select a Work Order Template panel.
You can select the Show Templates for Entity Type check box to view all templates related to the entity type at once. If the check box is cleared, only the work order templates associated with the service request template appear.
NOTE: Select a Work Order Category to further filter templates. It is set up on the template by the administrator. See Add or Edit a Work Order Template in the Admin Guide for Trimble Unity Maintain and Trimble Unity Permit for more information.
- Enter information in the Work Order Details panel.
NOTE: Some fields may be automatically populated if your administrator has set it up to do so.
- Click Create Work Orders.
- Open the inspection.
- Navigate to the Related Activities page from the activity toolbar.
- Click Create linked activity from the Related Work Orders panel.
The Create Work Order page opens. If there is an attached asset on the inspection, it appears in the Add Assets panel.
If you want to create a work order with no assets attached, see Create an Unattached Work Order for more information. If you want to attach assets to the work order, complete the following:
- Add assets from the map or by a UID. See Add Assets for more information.
- If you've added assets, click Create a work order for each asset to create an individual work order for each asset selected in the Add Assets panel. Click Create a single work order that includes all assets to create one work order for all the assets selected in the Add Assets panel.
TIP: You can filter the list of records displayed. See Filter Records for more information.
- Select the desired asset(s) to create work orders for.
NOTE: By default, all the assets are selected in the Add Assets panel. Clear the check box next to any assets that you do not want to attach to the work order. Click Clear Selection to clear all the check boxes for the selected assets.
The Asset Group and Asset Type fields automatically populate in the Select a Work Order Asset Type panel.
- Select Feature, Object, or Other. While features or objects (related tables) are found in the geodatabase, the others category allows work order templates to be created on anything stored in the database.
- Select the Work Order Template in the Select a Work Order Template panel.
NOTE: Select a Work Order Category to further filter templates. It is set up on the template by the administrator. See Add or Edit a Work Order Template in the Admin Guide for Trimble Unity Maintain and Trimble Unity Permit for more information.
- Enter information in the Work Order Details panel.
NOTE: Some fields may be automatically populated if your administrator has set it up to do so.
- Click Create Work Orders.
- Open the case.
- Navigate to the Case Related Activities page from the activity toolbar.
- Click Create linked activity from the Related Work Orders panel.
The Create Work Order page opens. Any attached assets on the case appear in the Add Assets panel.
If you want to create a work order with no assets attached, see Create an Unattached Work Order for more information. If you want to attach assets to the work order, complete the following:
- Add assets from the map or by a UID. See Add Assets for more information.
- If you've added assets, click Create a work order for each asset to create an individual work order for each asset selected in the Add Assets panel. Click Create a single work order that includes all assets to create one work order for all the assets selected in the Add Assets panel.
TIP: You can filter the list of records displayed. See Filter Records for more information.
- Select the desired asset(s) to create work orders for.
NOTE: By default, all the assets are selected in the Add Assets panel. Clear the check box next to any assets that you do not want to attach to the work order. Click Clear Selection to clear all the check boxes for the selected assets.
The Asset Group and Asset Type fields automatically populate in the Select a Work Order Asset Type panel.
- Select Feature, Object, or Other. While features or objects (related tables) are found in the geodatabase, the others category allows work order templates to be created on anything stored in the database.
- Select the Work Order Template in the Select a Work Order Template panel.
NOTE: Select a Work Order Category to further filter templates. It is set up on the template by the administrator. See Add or Edit a Work Order Template in the Admin Guide for Trimble Unity Maintain and Trimble Unity Permit for more information.
- Enter information in the Work Order Details panel.
NOTE: Some fields may be automatically populated if your administrator has set it up to do so.
- Click Create Work Orders.
- Add assets from the map or by a UID. See Add Assets for more information.
TIP: You can filter the list of records displayed. See Filter Records for more information.
- Select an asset from the Assets panel.
- Click Create Work Order(s).
The Create Work Order page opens.
- Click Create a work order for each asset to create an individual work order for each asset selected. Click Create a single work order that includes all assets to create one work order for all the assets selected.
- Select the desired asset(s) to create work orders for.
The Asset Group and Asset Type fields automatically populate in the Select a Work Order Asset Type panel.
- Select Feature, Object, or Other. While features or objects (related tables) are found in the geodatabase, the others category allows work order templates to be created on anything stored in the database.
- Select the Work Order Template in the Select a Work Order Template panel.
NOTE: Select a Work Order Category to further filter templates. It is set up on the template by the administrator. See Add or Edit a Work Order Template in the Admin Guide for Trimble Unity Maintain and Trimble Unity Permit for more information.
- Enter information in the Work Order Details panel.
NOTE: Some fields may be automatically populated if your administrator has set it up to do so.
- Click Create Work Orders.

