Configure Trimble Unity Single Sign-on
Trimble Unity Single Sign-on is managed in Admin using the Oauth 2 Clients page. When you log out and you are using Single Sign-on, it logs you out of your ArcGIS account as well.
|
|
- In Trimble Unity Admin, click the Admin tab and click OAuth2 Clients.
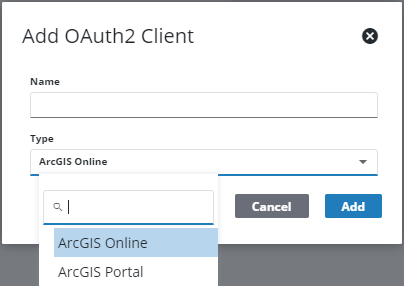
- Click Add record to add a client.
- Enter a name for the client and select the client Type from the drop-down list.

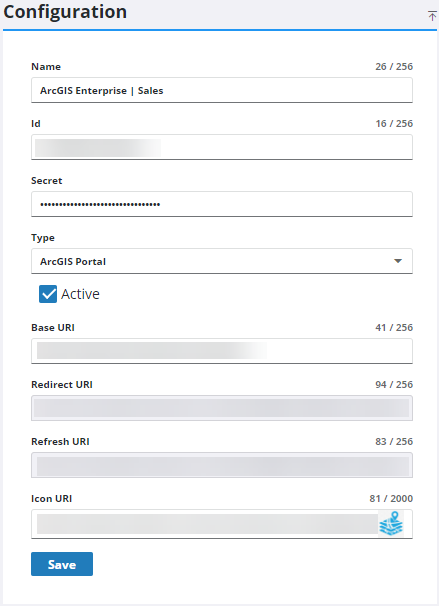
- Enter the App ID in the Id field. See Create the Application in ArcGIS Online or Portal for ArcGIS.
- Enter the App Secret in the Secret field. See Create the Application in ArcGIS Online or Portal for ArcGIS.
- The Type displays the type selected when the client was made, but can be changed using the drop-down list.
- Select the Active check box to mark the client as active.
- For the Base URI, enter the URL to access your organization's ArcGIS Online or Portal for ArcGIS site. For example: https://gis.trimbleunity.com/portal.
- The Redirect URI and Refresh URI fields are automatically populated based on the redirect field entered in the ArcGIS Online or Portal for ArcGIS application.
- To include an icon on the login page next to this single sign-on option, enter the Icon Uri in the field. A preview of the icon is shown next to Icon Preview. A valid URL that the server can access is required. If the URL is not in the same URL domain as the Trimble Unity website, you may encounter CORS issues.
- Click Save.


