Work Order Fields
 NOTE: Some fields or panels are hidden by default. Use Style to control which fields and panels are hidden or displayed. See Appendix 2: Fields and/or Panels Hidden by Default in the Style Guide for Trimble Unity Maintain and Trimble Unity Permit for more information on specific fields or panels that can be revealed or hidden.
When creating a work order, the Work Order Details panel shows the details of the work order.
- Address: Enter the location's address, and the address populates in the Location Information section when the work order is created.
- Location: Enter notes about the location, and the notes populate in the Location Information section when the work order is created.
- Geocode: Click to geocode the work order after you enter an address.
- Status: Select the status of the task, such as the state, condition, or situation of the work order. The status is automatically populated first by the initial status set on a workflow, second by manual population, and third by the Default Status - New preference set in Admin. Otherwise, the status is blank upon creation.
- Priority: Assign a priority rating.
- Requested By: Select the employee who requested the work order.
- Supervisor: Select the supervisor.
- Submit To: Select the person to submit the work order to. If the administrator has configured email notices for work order creation, emails are automatically sent to the Submit To person. A notification appears if an employee that does not have the required employee skills is added. See Employee Skills in the Admin Guide for Trimble Unity Maintain and Trimble Unity Permit for more information. If a Submit To Crew is selected, the Submit To is automatically set to the crew lead.
- Submit To Crew: Select the crew to submit the work order to. Crews must be assigned in Employee Relates in Admin for the drop-down list to be populated. If a Submit To Crew is selected, the Submit To is automatically set to the crew lead.
- Projected Start Date: Enter the projected start date.
- Stage: Select the stage. Actual is the default stage and does not restrict any functionality. Proposed is used for work orders that are created for planning purposes, like estimating costs. If Proposed is selected, some work order functionality will be restricted. The ELM, Permit Cost, and Documents functions are unavailable, and when viewing Labor, Materials, or Equipment you will not be able to add Actual costs or Transfer estimated to Actual.
- Expense Type: Select the type of expense.
- Shop: Select the shop, if applicable.
- Map Page: Enter the map page.
- Tile Number: Enter the tile number.
- District: Select the district.
- Instructions: Enter any instructions.
- Contract: Select a contract. See Contracts in the OpX Guide for Trimble Unity Maintain and Trimble Unity Permit for more information.
- Project: Select a project from the drop-down list to tie the work order to a project.
NOTE: Users need to clear the cached data for a new project to appear in the Project drop-down list. See Clear Cached Data for more information.
- Comments: Enter any comments.
- X/Y/Z: The coordinates of the location. The X and Y coordinates automatically populate if the address has been geocoded. Z coordinates are for use with 3D map services.
- Batch Size: Enter the number of activities to be created per batch that is used when creating activities in bulk. A progress indicator shows the creation of each batch, and once complete, all activities open on the work order edit page. The default is 10.
The Work Order panel appears on an existing work order. The Work Order panel shows all the general work order information. Some fields may be automatically populated if the administrator has set it up to do so, but you can change the information if needed.
- Description: This field automatically populates with the description selected when the work order was created, but can be changed.
NOTE: You cannot change the Description if a work order template class is in place. Any custom field data (category custom fields) are deleted if the work order description is changed.
- Number: This field automatically populates with the work order ID and cannot be changed. If you have more than one work order open, use the Number drop-down list to select other work orders to view.
- Sid: The work order Sid.
- Entity Type: This field automatically populates with the entity type selected when the work order was created. You can change it by clicking Change. Make sure to update any related fields, like Units Accomplished.
NOTE: You cannot change the Entity Type if a work order template class is in place.
- Category: Select the category for this work order.
- Initiated By/Date: This field automatically populates with the user who created the work order and the date/time it was created. If the Allow Changes to Initiated Date/Time preference is enabled in Admin, you can change the date and time.
- Status: Select the state, condition, or situation of the work order. The status field is read-only if a workflow is associated with the work activity. The only way to change the status is to complete the actions in the workflow. See Workflow Summary for more information.
- Priority: Select the order of importance for the work to be completed.
- Requested By: Select the user who requested the work order.
- Supervisor: Select the supervisor for the work order.
- Submit To: Select the person to submit the work order to. Only the Submit To or Submit To Crew can be selected, both may not be defined.
- Submit To Crew: Select the crew to submit the work order to. Crews must be assigned in Employee Relates in Admin for the drop-down list to be populated. Only the Submit To or Submit To Crew can be selected, both may not be defined.
- Submit To Date: This field automatically populates with the current date and time when the Submit To field is populated or updated.
- Projected Start: Enter the projected date for the work order to begin or select it using the calendar.
- Projected Finish: Enter the projected date for the work order to be completed or select it using the calendar.
NOTE: When a work order with an established cycle based on the projected start date is saved, you are prompted to create the child work order.
- Open By/Date: This field automatically populates when the Submit To user opens the work order. The date/time the work order was opened is also recorded. These two fields update every time the Submit To user opens the work order.
- Closed By/Date: This field automatically populates with the login of the user who closes the work order and today's date/time that it was closed. The date cannot be updated or modified on either the initial save or any subsequent edit.
- Completed By: Select the user who completed the work order.
- Actual Start: Enter the actual start date or select it using the calendar.
- Actual Finish: Enter the actual finish date or select it using the calendar.
- Stage: Select the stage. Actual is the default stage and does not restrict any functionality. Proposed is used for work orders that are created for planning purposes, like estimating costs. If Proposed is selected, some work order functionality is restricted. The ELM, Permit Costs, and Documents functions are unavailable, and when viewing Labor, Materials, or Equipment you are unable to add Actual costs or Transfer estimated to Actual.
- Expense Type: Select the expense type.
- Reactive?: Select this check box if the work order is reactive, meaning that the work is being performed in reaction to something that happened, as opposed to preventative, regularly-scheduled maintenance. Note that this check box may be selected by default if the work order template is defined as reactive in Admin.
- Instructions: Enter any instructions.
- Resolution: Select the final outcome of the work order. These are defined in Admin under Preferences > Work Order.
- Related: Click to open the Related Work Activities page. See Open a Related Work Activity for more information.
- Created Related Activity: Click to create a related activity.
- Link icon: Click to link work activities to the work order.
- Equipment Reservations: Click to open the Equipment Checkout page. See Open Equipment Check Out for more information.
- Checked Out Equipment: Click to open the Equipment Checkout page. See Open Equipment Check Out for more information.
The Details panel appears on an existing work order. The Details panel shows additional information about the work order.
- Project: Select a project from the drop-down list to tie the work order to a project.
NOTE: Users need to clear the cached data for a new project to appear in the Project drop-down list. See Clear Cached Data for more information.
- Account: Select an account. The contents of this list are populated by the administrator in Admin on the Preferences page. See Configure Custom Codes Preferences in the Admin Guide for Trimble Unity Maintain and Trimble Unity Permit for more information.
NOTE: You can enter a new account field and select it from the list. The new account is automatically added in Custom Codes to GLACCOUNT if the user has permission for the Preferences page in Employee Relates. Otherwise, the new account is only added to the work activity.
- Contract: Select a contract. See Contracts in the OpX Guide for Trimble Unity Maintain and Trimble Unity Permit for more information.
- Contractor: Select a contractor.
- Legal Billable: Select if the work order is legal billable.
- Contractor Billable: Select if the work order is billed to a contractor.
- Update map layers: This field can be used as a flag for whatever purpose your organization wishes. For example, it could be used for instances when the map or GIS need to be updated. The administrator can perform a search for work orders that have this field selected.
- Cancel: Select to cancel the work order. The Cancel check box is grayed out if a workflow is associated with the work activity. The only way to change the status is to complete the actions in the workflow.
- Canceled By/Date: If the work order has been canceled, these fields are automatically populated with the login of the user and today's date. The date cannot be updated or modified on either the initial save or any subsequent edit.
- Cancel Reason: Enter the reason the work order was canceled.
- Units Accomplished: Enter the number of units accomplished.
- Description: Select a description of the units. The contents of this list are populated by the administrator in Admin on the Preferences page. See Configure Custom Codes Preferences in the Admin Guide for Trimble Unity Maintain and Trimble Unity Permit for more information.
- Budget: Select the budget for the work order to track actual costs in the budget set in OpX. Only budgets that are configured for the work order template will display in the list. This field cannot be edited using Apply to All. See Budgets in the OpX Guide for Trimble Unity Maintain and Trimble Unity Permit for more information.
- Lock Units Desc.: Select to lock the units of measurement so that it cannot be changed.
- Add Costs: This allows you to add additional labor, equipment, or material information and costs to the work order.
NOTE: Costs populate according to data entered using Add Costs, from the Cost Details page, or in ELM. See Add Work Order Costs and Open ELM for more information.
- Request Material: Material requests can be created and sent to Storeroom where the Storeroom admin can approve or reject them.
The Location Information panel appears on an existing work order. The Location Information panel shows the work order location information.
- Geocode: The Geocode Results window allows you to select which address to use for the work order and geocode it without opening the map. See Geocode a Work Order for more information.
- Work Order Address: Enter the address of the work order.
- Location Details: Enter any location details relevant to the work order.
NOTE: If the asset being attached has the location field populated in the GIS, the location automatically populates in the Location Details field. No information is populated if multiple assets are selected.
- Shop: Select the shop.
- District: Select the district.
- Map Page: Enter the map page.
- Tile Number: Enter the tile number.
-
Facility Id: This is the Facility Id for the building where the asset is located. This field automatically populates if an asset is attached to the work activity. If multiple assets are added to the work activity, the first asset with a Facility Id defined is used. This corresponds with the facility and level IDs set up for assets in the geodatabase. See Add an Asset Type in the Admin Guide for Trimble Unity Maintain and Trimble Unity Permit for more information.
-
Level Id: This is the Level Id for the floor where the asset is located. This field automatically populates if an asset is attached to the work activity. If multiple assets are added to the work activity, the first asset with a Level Id defined is used. This corresponds with the facility and level IDs set up for assets in the geodatabase. See Add an Asset Type in the Admin Guide for Trimble Unity Maintain and Trimble Unity Permit for more information.
- X Location/Y Location/Z Location: The X and Y coordinates are automatically populated if the address has been geocoded. Z coordinates are for use with 3D map services.
NOTE: If there is an ADDRESS field in the GIS asset, the ADDRESS field in the WORKORDERENTITY table field updates when the work order is created. In addition, if a single asset is being attached, then the work order address field also populates with the value from the GIS asset ADDRESS field.
The Assets panel appears on an existing work order. The Assets panel shows information concerning the attached asset(s). The number of total entities is listed in the panel.
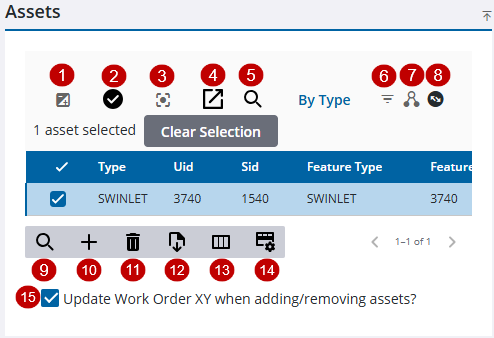
- Invert Selection: Click to switch between selected assets.
- Flag All: This allows you to mark work as complete for all assets in the panel or for each individual asset. This field only appears when you are viewing a work order.
- Center Map: Click to center the map on all the assets in the list or if an asset is selected, center the map on the selected asset.
- Select on Map: Click to highlight selected assets on the map. If no assets are selected in the Assets panel, then all the assets in the list will be selected.
- Lookup Assets: Click to open the Lookup Assets panel and search for assets by the asset type, UID, or the entity identifier.
- Filter Assets: Click to filter assets by work complete or work incomplete.
- Asset Details: Click to open the Asset Details page. See Asset Details for more information.
- Equipment Change Out: Click to open the selected assets in Equipment Change Out.
- Filter records: Click to quickly filter the list of fields in the panel.
- Add From Map: Click to add assets selected on the map.
- Delete selected records: Click to remove assets from the Assets panel.
- Export CSV: Click to export assets selected on the map to a .csv file.
- Column Menu: Click to modify the columns shown on the panel.
- Rows: Click to change the number of rows viewed at a time in the panel.
- Update Work Order XY when adding/removing assets?: Select to update the X and Y coordinates of the work order when assets are added or removed. If this is not selected, the X and Y coordinates do not change when assets are added or removed.
The Work Cycle panel appears on an existing work order. The Work Cycle panel shows all cyclical work orders associated with the work order. Preventative cyclical work orders may be set up to maintain an asset.
- Repeat: Select how often to repeat Never, Once, or Every.
- Interval: Enter the interval for the number of Days, Weeks, Months, or Years.
- Interval Unit: Select the interval of the cycle, such as by Days, Weeks, Months, or Years.
- Cycle From/Date: Select the cycle to start from. If you select Date, enter the date in the date field or select it using the calendar.
- Print Date: This field automatically populates with the date printed.
- Next Print Date: This field automatically populates with the next print date.
The following fields are found in the work order activity toolbar.
- Asset Readings: Click to manually update the asset reading on the work order. Assets must be configured for readings in Admin. See Asset Readings for more information.
- Attachments: Click to attach images, documents, or files related to the work order. See Use Attachments for more information.
- Audit Log: Click to view an audit log, which tracks all edits made to the work order. See View the Audit Log for more information.
- Cost Summary: Click to view the work order cost summary. See Cost Summary for more information.
- ELM: Click to quickly add labor, material, or equipment to the work order. ELM is for users who use crews. See ELM for more information.
- Equipment Checkout: Click to create reservations and check out or check in equipment. See Equipment Check Out for more information.
- Permit Costs: Click to view and edit simple permits and their costs. See Permit Costs for more information.
- Related Activities: Click to view any activities related or associated to the work order. See Related Work Activities for more information on opening related activities, adding new activities, linking to existing activities, and removing activities.
- Security: Click to view and edit the work order security. This is only available to domain administrators. See Security for more information.
- Tasks: Click to view, edit, or add tasks. See Tasks for more information.
The following fields and panels can be accessed from an existing work order on the Asset Readings page.
From the Readings panel:
- Work Order Id: This shows the work order you are adding the reading to. If multiple work orders were opened, click the drop-down list and select a different work order.
-
Filter records: Click to quickly filter the list of fields in the panel.
- Update Reading: Click to update the asset with the new reading.
- Delete selected records: Click to delete the selected reading.
-
Column Menu: Click to modify the columns shown on the panel.
- Add Reading: Click to add a reading to a selected asset.
From the Add/Update Readings panels:
- Reading Value: Enter the reading for the asset.
- Comments: Enter any comments. This only appears on the Add Reading panel.
- Add or Update: Click to save the reading.
The following fields and panels on the Permit Details panel on the Permit Costs page of an existing work order.
NOTE: Some fields have visible character max limits. The first number is the current count of how many characters have been used. The second number is the max characters allowed in the field.
- Permit Number: Enter the permit number.
- Cost: Enter the cost if any.
- Permit Type: Select the permit type. The contents of this field are populated in Admin under General > Permit Types. See Permit Types in the Admin Guide for Trimble Unity Maintain and Trimble Unity Permit for more information.
- Description: Enter a description of the permit.
- Requested By: Enter the name of the employee who requested the permit.
- Issued By: Enter the name of the employee who issued the permit.
- Date Issued: Enter the date the permit was issued or select it using the calendar.
- Date Expires: Enter the date the permit expires or select it using the calendar.
- Status: Select the status of the permit. The contents of this drop-down list are populated by the administrator in Admin under Preferences > Custom Codes > PMTSTAT. See Configure Custom Codes Preferences in the Admin Guide for Trimble Unity Maintain and Trimble Unity Permit for more information.
- Source: Select the group that issued the permit. The contents of this drop-down list are populated by the administrator in Admin under Preferences > Custom Codes > APSOURCE. See Configure Custom Codes Preferences in the Admin Guide for Trimble Unity Maintain and Trimble Unity Permit for more information.
- Comments: Enter any comments regarding the permit.
The following fields and panels can be found on the Add New Task(s) panel on the Tasks page of an existing work order.
- Task Leaf: Select this for a list of all available tasks defined in Admin.
- Work Order Template Task: Select this for the default tasks defined to the work order template.
- Sequence: Enter a number for the order that this task should be done.
- Response: Select a response or enter a free-form response. The Response field matches the task template's custom label, or defaults to Response if no custom label is defined. If multiple tasks are added to the work order and their templates all have the same response label, the label shows that shared label. If any label is different, the label shows the default label Response.
- Assigned To: Select the employee who the task is assigned to.
- Status: Select the status of the task, such as the state, condition, or situation of the work order.
- Shop: Select the shop, if applicable.
- Permit Number : Select the permit number, if applicable.
- Comments: Enter any comments related to the task.
- Projected Start Date: Enter the projected start date.
- Projected Finish Date: Enter the projected finish date.
- Actual Start Date: Enter the actual start date or select it using the calendar.
- Actual Finish Date: Enter the actual finish date or select it using the calendar.
- Rework: Select Yes or No to indicate if the work was not up to the standards set or must be redone for any reason.
- Proceed: Select Yes or No to indicate if the next task in the sequence can begin, even if the current task is not yet finished.

