Service Request Fields
The following are fields found when managing or creating service requests.
 NOTE: Some fields or panels are hidden by default. Use Style to control which fields and panels are hidden or displayed. See Appendix 2: Fields and/or Panels Hidden by Default in the Style Guide for Trimble Unity Maintain and Trimble Unity Permit for more information on specific fields or panels that can be revealed or hidden.
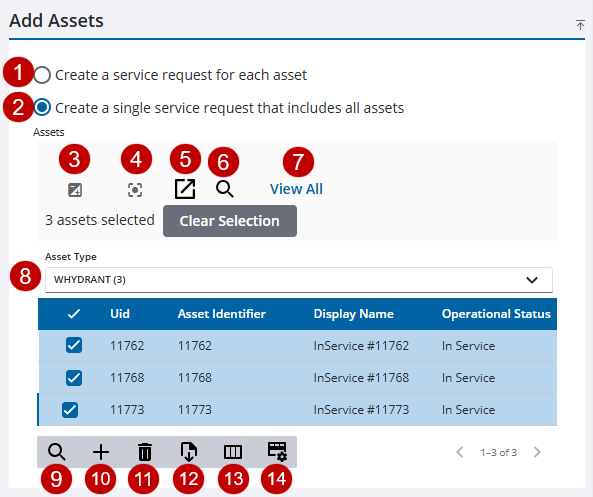
The Assets panel shows information concerning attached asset(s) when creating an service request. The number of total assets is listed in the panel.
- Create a service request for each asset: Select to create an individual service request for each asset selected.
- Create a single service request that includes all assets: Select to create one service request for all the assets selected.
- Invert Selection: Click to switch between selected assets.
- Center Map: Click to center the map on all the assets in the list or if an asset is selected, center the map on the selected asset.
- Select on Map: Click to highlight selected assets on the map. If no assets are selected in the Assets panel, then all the assets in the list will be selected.
- Lookup Assets: Click to open the Lookup Assets panel and search for assets by the asset type, UID, or the entity identifier.
- View All/By Type: Click to change how the assets are displayed on the panel. Click View All to display all the assets selected on the map. Click By Type to display the assets by Asset Type.
- Clear Selection: Click to clear all of the selected assets on the map and on the panel.
- Asset Type: Click to change the assets in the panel by type.
- Filter records: Click to quickly filter the list of fields in the panel.
- Add From Map: Click to add assets selected on the map.
- Delete selected records: Click to remove assets from the Assets panel.
- Export CSV: Click to export assets selected on the map to a .csv file.
- Column Menu: Click to modify the columns shown on the panel.
- Rows: Click to change the number of rows viewed at a time in the panel.
The Caller Information panel contains information related to a caller when creating a service request.
NOTE: Some fields have visible character max limits. The first number is the current count of how many characters have been used. The second number is the max characters allowed in the field.
- Caller Time: Use the calendar icon or enter the date and time of when the call was placed.
- Caller Type: Select the caller type from the drop-down list.
- Caller Title: Select a title from the drop-down list if needed. Titles are defined in Admin in Preferences. See Configure Service Request Preferences in the Admin Guide for Trimble Unity Maintain and Trimble Unity Permit for more information.
- Account: Enter a corresponding account number. This field automatically populates when a first or last name is selected.
NOTE: You can enter a new account field and select it from the list. The new account is automatically added in Custom Codes to GLACCOUNT if the user has permission for the Preferences page in Employee Relates. Otherwise, the new account is only added to the work activity.
- First Name: Enter one to three letters of the customer's first name. A list opens providing the user several name options. Select the appropriate name.
- Last Name: Enter one to three letters of the customer's last name. A list opens providing the user several name options. Select the appropriate name.
- Address: Enter the caller's address.
- Apartment Number: Enter an apartment number if applicable.
- City: Enter the city for the address.
- State: Enter the state for the address.
- Zip Code: Enter the zip code for the address.
- District: Select a district from the drop-down list.
- Day Phone: Enter a day phone number.
- Work Phone: Enter the caller's work phone number.
- Cell Phone: Enter the caller's cell phone number.
- Other Phone: Enter another phone number for the caller.
- Email: Enter the caller's email.
- Fax: Enter a fax number.
- Caller Information: Enter any additional information about the caller. This field may automatically populate when a caller is selected to add to the service request.
NOTE: This works when users select a caller based on the customer account information and all the caller fields are automatically populated.
- Owner?: Select if the caller is the owner of the property.
- Follow-up Call?: Depending on how your organization has decided to use this check box, select to note that a follow-up call is needed, or that a follow-up call has been made. This field can be searched to show you what service requests need a follow-up call.
- Search Callers: Click to search for the caller.
- Clear: Click to clear the caller results.
The Incident Information panel contains information about the problem when creating a service request.
NOTE: Some fields have visible character max limits. The first number is the current count of how many characters have been used. The second number is the max characters allowed in the field.
- Create New Service Request: Select this to create a new service request.
- Add to Existing Service Request: Select this to add the problem to an existing service request.
- Copy Address from Caller: Click to copy information from the Caller Information panel to the Incident Information panel.
- Copy Address to Caller: Click to copy information from the Incident Information panel to the Caller Information panel.
- Address: Enter the address.
- Apartment Number: Enter an apartment number, if applicable.
- City: Enter the city.
- State: Enter the state.
- Zip Code: Enter the zip code.
- Geocode: Click to geocode the address.
- District: Select a district, if desired. Districts can represent any geographical area and are populated in Admin. If this field is blank, that means the administrator has not entered any districts. See Configure Map Preferences in the Admin Guide for Trimble Unity Maintain and Trimble Unity Permit for more information.
- Landmark: Select a landmark, if desired. This field is populated in Admin under Preferences > Custom Codes > LANDMARK. If it is blank, that means the administrator has not entered any landmarks. See Configure Custom Codes Preferences in the Admin Guide for Trimble Unity Maintain and Trimble Unity Permit for more information.
- Map Page: Enter the map page number, if desired. This field is used to indicate the geographic area of the incident.
- Shop: Select a shop. This field is populated in Admin under Preferences > Map > Shop Values. If it is blank, that means the administrator has not entered any shops. See Configure Map Preferences in the Admin Guide for Trimble Unity Maintain and Trimble Unity Permit for more information.
- Tile Number: Enter the map tile number, if desired. This field is used to indicate the geographic area of the incident.
- Location: Enter any additional details about the location of the incident that help to identify it (for example, Northwest corner of the intersection).
- Submit To: Select an employee to submit the service request to.
- Submit To Crew: Select the crew to submit the service request to. Crews must be assigned in Employee Relates in Admin for the drop-down list to be populated. If a Submit To Crew is selected, the Submit To is automatically set to the crew lead.
- Dispatch To: Select an employee to dispatch the service request to.
- Project: Select a project from the drop-down list to tie the work order to a project.
NOTE: Users need to clear the cached data for a new project to appear in the Project drop-down list. See Clear Cached Data for more information.
- Details: Enter any other details about the service request.
- X/Y/Z: The X, Y, and Z coordinates automatically populate when the address is geocoded. Z coordinates are for use with 3D map services.
- Comments: Enter any comments related to the incident. See Comments for more information.
- Batch Size: Enter the number of activities to be created per batch that is used when creating activities in bulk. A progress indicator shows the creation of each batch, and once complete, all activities open on the service request edit page. The default is 10.
The Service Request panel shows all of the general service request information when viewing an existing service request. Some of the information in the data fields may populate by default according to the configuration set by the administrator.
- Service Request Id: This field automatically populates with the unique service request ID and cannot be changed.
- Status: Select the state, condition, or situation of the service request. The status is automatically populated first by the initial status set on a workflow and second by the Default Status - New preference set in Admin. Otherwise, the status is blank upon creation. The status field is read-only if a workflow is associated with the work activity. The only way to change the status is to complete the actions in the workflow.
- Description: This field automatically populates with the problem code selected when the service request is created. This field cannot be changed.
- Category: This field automatically populates with the category selected when the service request was created.
- Priority: Select the order of importance for the work to be completed.
- Initiated By: This field automatically populates with the login ID of the person who created the service request.
- Initiated Date: This field automatically populates with the date and time it was created.
NOTE: The Initiated Date field cannot be changed unless the Allow Changes to Initiated Date/Time check box is selected in Admin in Preferences > General. See Configure Domain Preferences in the Admin Guide for Trimble Unity Maintain and Trimble Unity Permit more information.
- Submit To: Select the person to submit the service request to.
- Submit To Crew: Select the crew to submit the service request to. Crews must be assigned in Employee Relates in Admin for the drop-down list to be populated. If a Submit To Crew is selected, the Submit To is automatically set to the crew lead.
- Submit To Date: The date/time field automatically populates with the current date and time when the Submit To field is populated or updated.
- Submit To Opened By: This field automatically populates with the Submit To user when that user opens the service request.
- Submit To Open Date: The date/time field automatically populates with the current date and time the Submit To user opens the service request.
- Dispatch To: Select the person to dispatch the service request to.
- Dispatch To Date: The date/time field automatically populates with the current date and time when the Dispatch To field is populated or updated.
- Dispatch To Opened By: This field automatically populates with the Dispatch To user when that user opens the service request.
- Dispatch To Open Date: The date/time field automatically populates with the current date and time the Dispatch To user opens the service request.
- Investigation ?: Select if this service request has been investigated.
- Investigation Date: The date and time the service request was investigated is automatically populated or cleared when the Investigation? check box is selected or cleared. You can also use the calendar icon to change the date and/or time, if needed.
- Project: Select a project name from the drop-down list.
- Projected Start Date: Enter the projected start date.
- Projected Complete Date: If not already populated, enter the date of the expected completion of the service request.
NOTE: The projected completion date calculates using the Duration and Duration Units defined on the service request template in Admin. See Add or Edit a Service Request Template in the Admin Guide for Trimble Unity Maintain and Trimble Unity Permit for more information. If nothing is defined in Admin for Duration and Duration Units, the projected completion date field is blank.
- Emergency?: Select if this service request is an emergency.
- Work Order Needed?: Select if a work order is required.
- Cancel: Select Cancel to cancel the service request.
- Cancel Date: The date/time field automatically populates with the current date and time when the service request is canceled.
- Cancel Reason: Enter the reason why the service request was canceled.
- Canceled By: This field automatically populates with the login of the user who closed the service request.
- Closed By: This field automatically populates with the login of the user who closes the service request.
- Closed Date: The date/time field is automatically populated with the current date and time when the service request is closed.
- Resolution: Select the final outcome of the service request. These are defined in Admin in Preferences. See Configure Service Request Preferences in the Admin Guide for Trimble Unity Maintain and Trimble Unity Permit for more information.
- Labor Cost: This field automatically populates with the total cost of the labor if labor is added to the service request.
- Related: Click to open the Related Work Activities page. See Open a Related Work Activity for more information.
- Created Related Activity: Click to create a related activity.
- Link icon: Click to link work activities to the service request.
The Incident Information panel shows address information associated with the incident on an existing service request.
NOTE: Some fields have visible character max limits. The first number is the current count of how many characters have been used. The second number is the max characters allowed in the field.
- Address: Enter the address.
- Apartment: Enter the apartment number.
- City: Enter the city.
- State: Enter the state.
- Zip Code: Enter the zip code.
- Landmark: Select the landmark from the drop-down list. The contents of this drop-down list are populated by the administrator in Admin in Preferences. If it is blank, that means the administrator has not entered any landmarks. See Configure Custom Codes Preferences in the Admin Guide for Trimble Unity Maintain and Trimble Unity Permit for more information.
- Shop: Select the shop from the drop-down list. This field is populated in Admin in Preferences. If it is blank, that means the administrator has not entered any shops. See Configure Map Preferences in the Admin Guide for Trimble Unity Maintain and Trimble Unity Permit for more information.
- Tile Number: Enter the tile number. This field is used to indicate the geographic area of the incident.
- Map Page: Enter the map page. This field is used to indicate the geographic area of the incident.
- District: Select the district from the drop-down list. Districts can represent any geographical area and are populated in Admin in Preferences. If this field is blank, that means the administrator has not entered any districts. See Configure Map Preferences in the Admin Guide for Trimble Unity Maintain and Trimble Unity Permit for more information.
- Location: Enter any additional details about the location of the incident that help to identify it (for example, Northwest corner of the intersection).
- Details: Enter any details.
-
Facility Id: Enter the Facility ID for the building where the incident occurred. This corresponds with the facility and level IDs set up for assets in the geodatabase. See Add an Asset Type in the Admin Guide for Trimble Unity Maintain and Trimble Unity Permit for more information.
-
Level Id: Enter the Level ID for the floor level where the incident occurred. This corresponds with the facility and level IDs set up for assets in the geodatabase. See Add an Asset Type in the Admin Guide for Trimble Unity Maintain and Trimble Unity Permit for more information.
NOTE: Use Style to make the Facility Id and Level Id fields visible on the Incident Information panel. See Make a Control or Panel Visible in the Style Guide for Trimble Unity Maintain and Trimble Unity Permit for more information.
- X/Y/Z: The X and Y coordinates automatically populate when the address is geocoded. Z coordinates are for use with 3D map services
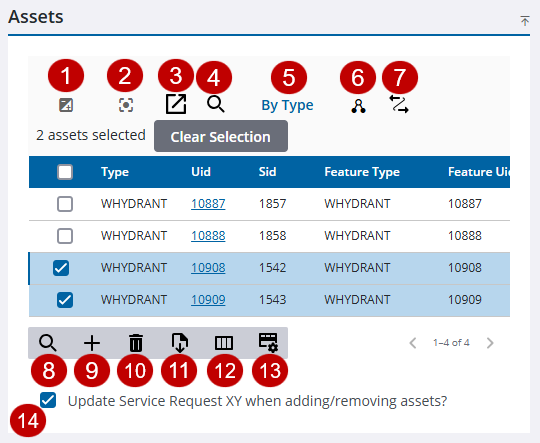
The Assets panel shows information concerning the attached asset(s) to an existing service request. The number of total assets is listed in the panel.
- Invert Selection: Click to switch between selected assets.
- Center Map: Click to center the map on all the assets in the list or if an asset is selected, center the map on the selected asset.
- Select on Map: Click to highlight selected assets on the map. If no assets are selected in the Assets panel, then all the assets in the list will be selected.
- Lookup Assets: Click to open the Lookup Assets panel and search for assets by the asset type, UID, or the entity identifier.
- View All/By Type: Click to change how the assets are displayed on the panel. Click View All to display all the assets selected on the map. Click By Type to display the assets by Asset Type.
- Asset Details: Click to open the Asset Details page. See Asset Details for more information.
- Equipment Change Out: Click to open the selected assets in Equipment Change Out.
- Clear Selection: Click to clear all of the selected assets on the map and on the panel.
- Filter records: Click to quickly filter the list of fields in the panel.
- Add From Map: Click to add assets selected on the map.
- Delete selected records: Click to remove assets from the Assets panel.
- Export CSV: Click to export assets selected on the map to a .csv file.
- Column Menu: Click to modify the columns shown on the panel.
- Rows: Click to change the number of rows viewed at a time in the panel.
- Update Service Request XY when adding/removing assets?: Select to update the X and Y coordinates of the service request when assets are added or removed. If this is not selected, the X and Y coordinates do not change when assets are added or removed.
The following fields display on the Labor Details tab of the Service Request Labor panel of an existing service request.
- Description: Enter a description for the labor.
- Start Time: Enter a start time.
- Finish Time: Enter a finish time.
- Hours: Enter the number of hours.
- Account: Select an account. The contents of this list are populated by the administrator in Admin under Preferences > Custom Codes > GLACCOUNT.
NOTE: You can enter a new account field and select it from the list. The new account is automatically added in Custom Codes to GLACCOUNT if the user has permission for the Preferences page in Employee Relates. Otherwise, the new account is only added to the work activity.
- Regular: Select if the regular pay rate is being used.
- Overtime: Select if the overtime pay rate is being used.
- Holiday: Select if the holiday pay rate is being used.
- Benefit: Select if the benefit pay rate is being used.
- Standby: Select if the standby pay rate is being used.
- Shift Diff.: Select if the shift differential pay rate is being used.
- Overhead: Select if the overhead pay rate is being used.
- Other: Select if the other pay rate is being used.
NOTE: These pay rates are configured in Admin > Employees > Labor Rates. See Configure Labor Rates for an Employee in the Admin Guide for Trimble Unity Maintain and Trimble Unity Permit for more information.
- Job Code: Select a job code from the drop-down list. This drop-down list only appears if you are using dynamic cost codes and a job code has been configured. It will also only appear if labor is added during the date range configured on the job code.
NOTE: Dynamic cost codes can be used to customize rates, so if the rate types vary from those shown, the domain administrator has set up labor to use custom rates. The applicable rates are added for each employee, so the available selections may vary by employee. See Configure Dynamic Cost Codes in the Admin Guide for Trimble Unity Maintain and Trimble Unity Permit for more information.
The Caller Information panel contains information related to a caller when adding a caller from the Callers tab on the toolbar.
- Caller Time: Use the calendar icon or enter the date and time of when the call was placed.
- Caller Type: Select the caller type from the drop-down list.
- Title: Select a title from the drop-down list if needed. Titles are defined in Admin in Preferences. See Configure Service Request Preferences in the Admin Guide for Trimble Unity Maintain and Trimble Unity Permit for more information.
- Account: Enter a corresponding account number. This field automatically populates when a first or last name is selected.
NOTE: You can enter a new account field and select it from the list. The new account is automatically added in Custom Codes to GLACCOUNT if the user has permission for the Preferences page in Employee Relates. Otherwise, the new account is only added to the work activity.
- First Name: Enter one to three letters of the customer's first name. A list opens providing the user several name options. Select the appropriate name.
- Last Name: Enter one to three letters of the customer's last name. A list opens providing the user several name options. Select the appropriate name.
- Address: Enter the caller's address.
- Apartment Number: Enter an apartment number if applicable.
- City: Enter the city for the address.
- State: Enter the state for the address.
- Zip Code: Enter the zip code for the address.
- Day Phone: Enter a day phone number.
- Other Phone: Enter another phone number for the caller.
- Cell Phone: Enter the caller's cell phone number.
- Fax: Enter a fax number.
- Work Phone: Enter the caller's work phone number.
- Email: Enter the caller's email.
- Onsite?: Select if the caller is on the premises of the problem.
- Onsite Date: Select the date when the caller was on the premises.
- Callback?: Select if this call is a repeat call.
- Callback Date: Select the date of the callback call.
- Owner?: Select if the caller is the owner of the property.
- Follow-up Call?: Depending on how your organization has decided to use this check box, select to note that a follow-up call is needed, or that a follow-up call has been made. This field can be searched to show you what service requests need a follow-up call.
- Problem Details:
- Caller Information: Enter any additional information about the caller. This field may automatically populate when a caller is selected to add to the service request.
NOTE: This works when users select a caller based on the customer account information and all the caller fields are automatically populated.
The following fields are found in the service request activity toolbar.
- Audit Log: Click to view an audit log, which tracks all edits made to the work order. See View the Audit Log for more information.
- Callers: Click to track or edit any caller information. See Callers for more information.
- ELM: Click to quickly add labor or equipment to the service request. ELM is for users who use crews. See ELM for more information.
- Labor: Click to add any labor. See Labor for more information.
- Related Activities: Click to view any activities related or associated to the service request. See Related Work Activities for more information on opening related activities, adding new activities, linking to existing activities, and removing activities.

