Cases
You can view, edit, and create cases in the app when all prerequisites are met.
|
|
 PREREQUISITES:
Permit is a GIS-centric community development and management application. It enables agencies to track permits, planning and development activities, engineering processes, business or regulatory licenses, and code enforcement cases from initiation to closure. The built-in workflow engine efficiently tracks all applicable tasks, from initial application or citizen/customer call, through departmental plan reviews, fee collection, permit issuance, inspections, board and commission meetings, abatement, court hearings, license renewals, and more.
A case (also known as a permit) is a specific occurrence or matter requiring decision, investigation, and/or work activities by officials. Permits, business licenses, and code enforcement activities with their applicable tasks are configured in case templates. Specific case templates can be configured to manage different processes. The following items are the basic elements that can be included in a case. A case template is set up to only include the relevant items.
- Address/GIS
- Condition
- Contractor
- Data Group
- Deposit
- Fees
- Flags
- GIS Alerts
- Inspection Request
- Instrument
- Licenses
- Main
- Notes
- Payment
- People
- Related Documents (also known as attachments)
- Violations
- Workflow and tasks
You can set up as many templates as you need in order to manage all your processes. See Add a Case Template in the Admin Guide for Trimble Unity Maintain and Trimble Unity Permit for more information.
 BEST PRACTICE: To ensure successful data synchronization, do not use case templates in Trimble Unity Field for Permit that require Case Data Group input during or after the creation process if you are not using Trimble Unity Respond to manage and complete those required workflows. See Case Data Setup Fields in the Admin Guide for Trimble Unity Maintain and Trimble Unity Permitfor more information.
 View Cases in the Work Activity List
The work activity list displays all of the work activities in your selected work activity type.
- Tap the work activity type drop-down on the Top Navigation menu.
The View panel opens, displaying each activity type along with the number of work activities in each work activity list. The displayed count indicates how many activities of that type are assigned to you. For example, Assigned to me (7) above Service Requests indicates that there are seven service requests assigned to you.
- Tap Cases.
The work activity list updates.
Configuring Template Map Logic
You can configure template map logic in Admin to use specific rules that allow or restrict case creation based on geographic conditions. This ensures a case is not created in the wrong area, or in an area that is not serviced.
 IMPORTANT: When configuring template map logic conditions, it is important to understand that the validation is triggered by the geographic point location (centroid) and not the specific assets selected by the user. It is best practice to ensure your custom error messages clearly explain that the validation is location-based to prevent user confusion when a case is restricted. IMPORTANT: When configuring template map logic conditions, it is important to understand that the validation is triggered by the geographic point location (centroid) and not the specific assets selected by the user. It is best practice to ensure your custom error messages clearly explain that the validation is location-based to prevent user confusion when a case is restricted. |
See Template Map Logic and Add a Template Map Logic Condition in the Admin Guide for Trimble Unity Maintain and Trimble Unity Permit for more information.
How Validation Works
- Location-Based: Conditions are validated based on the geographic point location (centroid) of the case being created, not the specific assets associated with it.
- Centroid Calculation: If you select multiple parcels, the app calculates the center point (centroid) of all selected items to determine the case's X, Y coordinates.
- Map Query: At the time of case creation, the app queries all configured map layers—including underlying layers that may not be selectable in the app—at that specific X, Y coordinate.
- Offline Support: Template map logic is synced to the device and validation will trigger even while working offline.
- Validation Failure: If conditions are not met, an error message appears explaining why the case could not be created at that location. This message is customized by your administrator to provide specific guidance.
Understanding the Validation Process
To understand why a case may be allowed or restricted, consider the following sequence:
- Configuration: You configure the template map logic in Admin.
- Selection: In the app, you select at least one or more assets or parcels on the map.
- Centroid Calculation: The application calculates a new geographic center point (centroid) based on the selected items. This centroid becomes the specific X, Y coordinate for the case.
- Map Query: When you tap Save, the app queries the map at that exact X, Y coordinate. The system checks all configured map layers and assets at that point, regardless of whether you manually selected them or if the layers are selectable in the app.
- Validation: The application compares the assets found at the location against the predefined template map rules.
- Success: If the conditions are met, the case is created.
- Failure: If the conditions are not met (e.g., attempting a residential addition in a commercial zone), a custom error message appears and the case is not created.
Create a Case
You can create a case using the Add icon on the map.
- Open the Map.
- Tap the Add icon.
The Add panel opens.
- Tap Cases.
- Select a Category.
- Select a Template.
The Create Case panel appears.
- Enter information into the desired fields for the case.
- Tap Save.
|
|
The case is created and appears on the map and in your activity list.
Edit a Case
You can edit an existing case.
- Tap a case.
- Edit the case details. See View Work Activity Details for more information.
- Tap Save.
The case is updated.
|
|
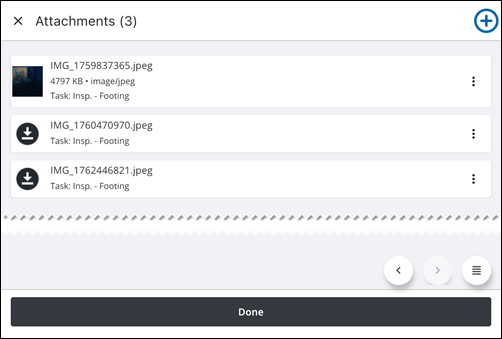
 NOTE: Attachments added to a case task are automatically rolled up to the parent case, ensuring the attachment is visible on both the case task and the parent case. The case task name is automatically associated with the attachment when it is added and is viewable in both the app and in Respond.
  View Tasks Associated to a Case
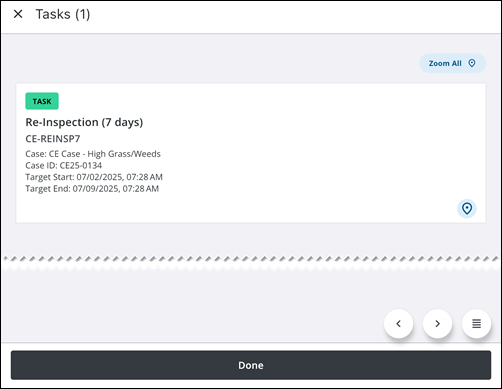
You can view tasks associated to a case.
- Open a case.
- Tap Tasks.
The Tasks page opens. The number in parentheses displays the number of tasks associated to the case.
The following options are available from the Tasks page:
- Zoom All: Tap to zoom to all tasks on the map.
- Map icon: Tap to view the task on the map.
- Done: Tap to return to the case work activity details page.
- Tap on a task to open the Task work activity details page.
The task opens. See Case Tasks for more information.
View Violations Associated to a Case
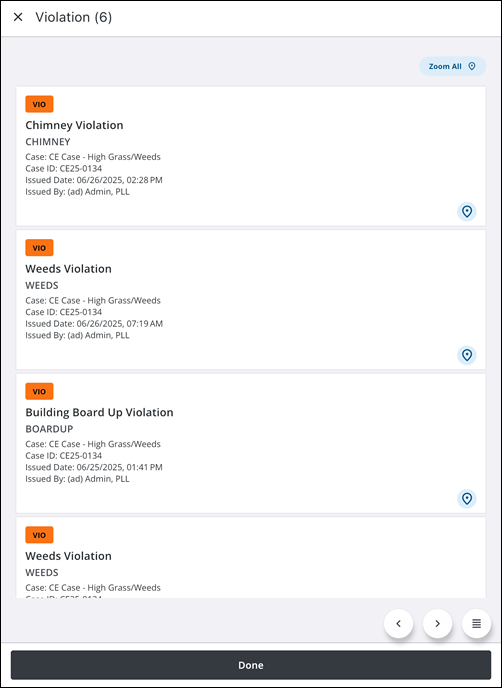
You can view violations associated to a case.
- Open a case.
- Tap Violation.
The Violation page opens. The number in parentheses displays the number of violations associated to the case.
The following options are available from the Violation page:
- Zoom All: Tap to zoom to all tasks on the map.
- Map icon: Tap to view the task on the map.
- Done: Tap to return to the case work activity details page.
- Tap on a violation to open the Violation work activity details page.
The violation opens. See Case Violations for more information.
Manage Case Comments and Replies
You can now engage in two-way communication directly within a case using threaded comments, which prevents feedback from getting buried and ensures the context of a conversation is never lost.
View Existing Comments
You can see if a case has existing comments directly from the case details page.
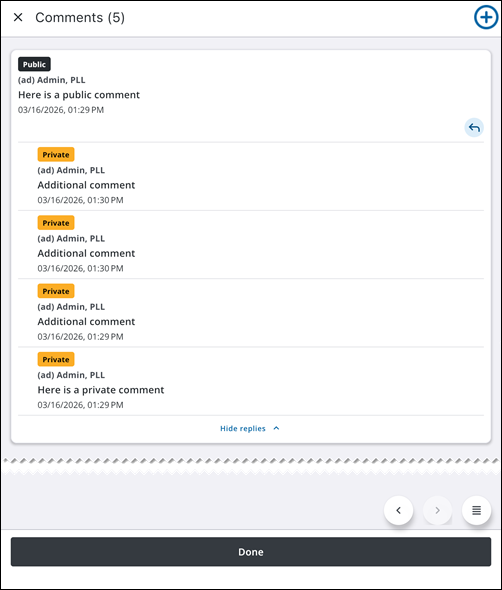
The Comments row displays the number of comments associated with the case.
For example, Comments (5) indicates a total for five comments (including replies).
- From the case details page, tap Comments.
The Comments page opens
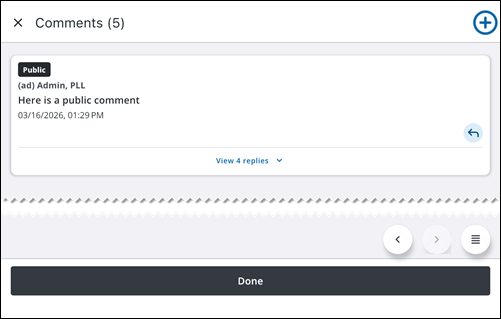
Comment threads are collapsed by default to keep the history clean.The most recent comment appears at the top of the list.
- Tap View [#] replies to expand a conversation and view the full resolution history.
Icon badges indicate whether a comment is marked as Public (visible to Public Access users) or Private (internal only).
Add a New Comment
You can add a new comment.
- Tap the Add icon to add a new comment to the case.

The Add Comment panel opens.
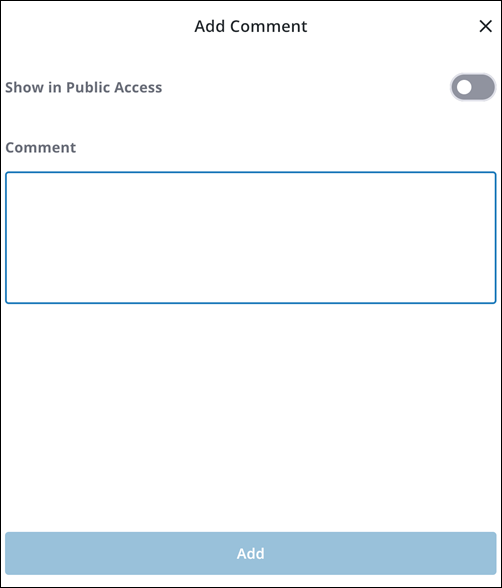
- To make the comment publicly visible, tap to toggle the Show in Public Access option. To keep the comment internal, ensure the toggle is off.
- Enter the comment into the Comment box.
- Tap Add.
The Comments page is updated.
Add a New Reply to an Existing Comment
You can add a new reply to an existing comment thread.
- Locate the parent comment that you want to address and tap the Reply icon.
The Reply to Comment panel opens.
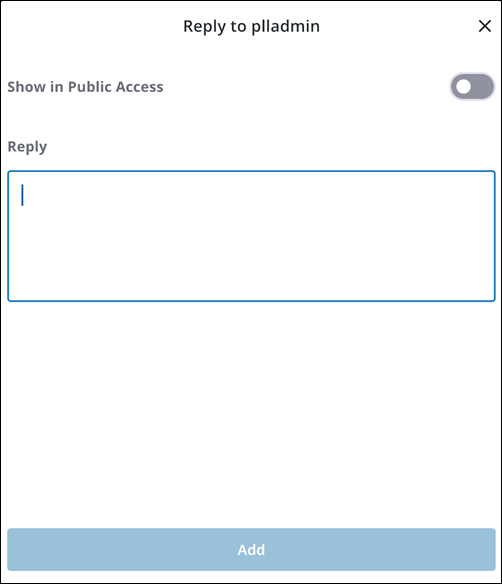
- To make the reply publicly visible, tap to toggle the Show in Public Access option. You can choose to reply privately by ensuring the Show in Public Access option toggle is off.
- Enter the reply into the Comment box.
- Tap Add.
The Comments page is updated. The newest comment appears at the top of the list.
This creates a threaded conversation tied to the specific issue, making the review process faster for both field and office users.

